이 문서에서는 Windows 10에서 요청하지 않고 파일 삭제를 중지하고 강력한 데이터 복구 도구를 사용하여 삭제된 모든 데이터를 복구할 수 있는 다양한 효과적인 방법을 안내해 드리겠습니다.
Windows 10으로 업그레이드한 후 문제가 발생한 적이 있으십니까? 파일이 자동으로 삭제되는가? Windows 10에서 모든 관련 데이터를 요청하거나 복원하지 않고 파일을 삭제하지 못하도록 하는 솔루션을 찾으십니까? 많은 윈도우 10 사용자들은 윈도우 10이 그들의 파일을 묻지도 않고 삭제하는 문제를 보고해왔다.
그런 문제에 직면해도 걱정하지 마라. 이 자료에서는 Windows 10에서 요청하지 않고 파일 삭제를 중지하고 Bitwar Data Recovery 소프트웨어를 사용하여 소중한 데이터를 되찾을 수 있는 최상의 방법을 제공한다.
윈도우 10에서 손실된 데이터 복구
시작 시 데이터 손실 위험을 방지할 수 있도록 Bitwar Data Recovery를 사용하여 모든 중요 데이터를 검색하는 것이 가장 좋다. 그것은 매우 믿을만하고, 효율적이며, 빠르다. 게다가 누구나 쉽게 사용할 수 있도록 사용자 친화적인 플랫폼에 기반을 두고 있다.
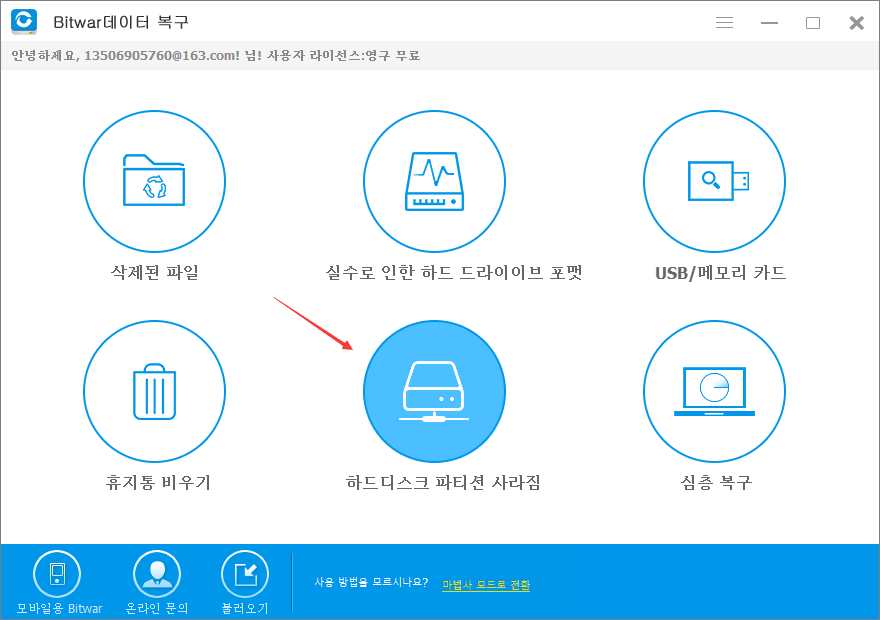
Windows 10에서 요청하지 않고 파일을 삭제할 때 Bitwar Data Recovery를 사용하여 데이터를 복구하려면 다음 단계를 따르십시오.
Mac OS 컴퓨터에서 외장 하드 드라이브를 연결하면 갑자기 나타나지 않습니다. 맥에서 “USB 플래시 드라이브가 표시되지 않습니다” 문제를 어떻게 해결할 수 있습니까? 맥이 외장하드 표시를 읽을 수 있지만 열 수 없는 경우 맥에서 손실된 데이터를 복구하는 방법은 무엇입니까? 이 문서에서는 답을 찾을 수 있습니다.
사용자는 컴퓨터 파일의 저장, 데이터 백업 및 전송에 자주 사용되는 외장 하드 드라이브를 사용하는 것을 좋아합니다. 일반적으로 외장 하드 드라이브를 Mac에 연결하면 바탕 화면에 빠르게 마운트됩니다. 그리고 Mac OS는 Mac이 내부 디스크와 동일한 방식으로 취급하기 때문에 쉽게 찾을 수 있도록 합니다.
그러나 Mac에 외부 드라이브가 표시되지 않는 경우도 있습니다. 특히 내부의 데이터가 절실히 필요한 경우 성가신 일입니다.
Mac에서 “외장 하드 드라이브가 표시되지 않습니다”을 수정하는 방법
솔루션 1: 모든 포트를 확인합니다.
디스크 유틸리티/파인더에 표시되지 않는 외장 하드 드라이브를 발견하면 먼저 USB 포트, USB 케이블 및 드라이브를 확인하십시오.
1. 외장 하드 드라이브에서 Mac으로 연결되는 케이블이 적절하게 연결되어 있는지 확인하십시오.
2. USB 케이블 또는 USB 포트의 상태를 확인하십시오. 식별하기 위해 다른 케이블이나 포트를 사용해 보십시오.
3. Mac OS를 재부팅하여 열려 있는 프로그램인지 아니면 앱인지 확인하여 드라이브 탐지를 중지하십시오.
4. 외장 하드 드라이브를 다른 컴퓨터에 연결하여 해당 컴퓨터에서도 작동하는지 확인해 보십시오.
솔루션 2: 외장 하드 드라이브에서 데이터를 먼저 복구합니다.
대부분의 복구 작업은 외장 하드 드라이브에서 데이터 손실을 초래할 수 있으므로 Mac의 외장 하드 드라이브에서 삭제된 파일을 복구하는 데 도움이 되는 신뢰할 수 있는 데이터 복구 소프트웨어가 필요하며 Mac용 Bitwar 데이터 복구는 모든 저장 장치에서 삭제되거나 손실된 파일을 복구할 수 있도록 지원하는 Mac을 위한 읽기 전용및 사용하기 쉬운 데이터 복구 소프트웨어입니다.
외장 하드 드라이브에서 데이터를 복구하는 방법
Mac용 Bitwar Data Recovery를 다운로드하여 설치하십시오: https://kr.bitwar.net/. 이 소프트웨어는 OS X 10.11 이후와 호환됩니다.
● 의도하지 않은 삭제 ( 실수로 파일이나 폴더를 삭제했지만 이 파일/폴더를 사용해야 할 때까지 인식하지 못함).
● 바이러스는 개인 파일을 삭제하거나 숨겼다.
● Windows 자동 업그레이드 또는 업데이트(데스크톱 파일과 설치된 앱이 제거될 가능성이 가장 높음).
● 하드 드라이브가 고장나고 있다.
● 새 사용자 계정을 로그인하셨습니다.
갑자기 사라진 파일을 복구하는 방법?
갑자기 사라지거나 완전 삭제된 파일을 복구하려면 Bitwar Data Recovery가 좋은 도움이 될 것이다.
Bitwar 데이터 복구는 빠른 속도, 보안 및 강력한 기능을 갖춘 최고의 데이터 복구 소프트웨어다. 오디오, 비디오, 사진, 압축 파일, 문서 등 모든 종류의 파일을 복구할 수 있다. 파일을 삭제하든, 분실하든, 포맷하든 Bitwar는 파일을 쉽게 되찾을 수 있다. 또한 복구 전에 파일을 미리 볼 수 있어 복구할 파일을 더 쉽게 선택할 수 있다.
손실된 데이터가 포함되지 않은 파티션이나 드라이버에 Bitwar Data Recovery 소프트웨어를 다운로드하여 설치하십시오: https://kr.bitwar.net/.
우리가 실수로 “삭제”버튼을 눌렀을 때 중요한 파일을 삭제 한 후, 우리는 휴지통에 그들을 보일 수 있습니다. 대부분의 경우에, 우리는 해당 폴더에서 삭제 된 파일을 찾을 수 있습니다。하지만,우리가 휴지통을 비운 경우, 그 안에 파일이 사라。사용자는 그 안에 저장된 모든 문서를 잃게 얻을. 실제로, 휴지통에서 삭제 된 항목은 Bitwar 데이터 복구 소프트웨어로 복구 할 수 있습니다.
많은 윈도 10 사용자들은 시스템을 윈도 10으로 업그레이드하고 USB 플래시 드라이브, 하드 디스크 또는 메모리 또는 SD 카드를 연결하려고 할 때 디렉토리가 유효하지 않다는 문제가 발생한다고 보고했습니다. 외부 저장 장치에 액세스할 수 없으므로 저장된 저장 장치에도 액세스할 수 없습니다.
이 오류의 가능한 원인
“디렉토리 이름이 올바르지 않습니다” 문제를 일으키는 주요 이유는 다음과 같습니다.
1. 결함 또는 손상된 포트
2. 디스크 오류.
3. 잘못된 디스크 드라이버.
디렉토리 올바르지 않음 문제를 해결하는 가장 좋은 솔루션
솔루션 1: 포트 변경
“디렉토리 이름이 올바르지 않습니다” 문제에 직면했을 때 가장 쉽게 따를 수 있는 검사는 포트를 변경하는 것입니다. 이전에 사용한 포트가 비활성 상태이거나 작동하지 않을 수 있으므로 다른 포트에 저장 장치를 삽입해 보십시오. 문제가 해결되지 않으면 아래의 해결 방법을 따라 문제를 해결하십시오.
솔루션 2: 디스크 오류 검사
디스크 검사는 스캔을 통해 디스크 오류를 확인한 다음 수정을 시도하는 내장 소프트웨입니다.
1 단계. 키보드에서 Win + E를 눌러 내 PC로 이동하십시오.
2 단계. 로컬 디스크에서 마우스 오른쪽 버튼을 클릭하여 속성을 선택하십시오.
3 단계. 도구 탭을 클릭하고 검사 버튼을 선택하십시오.
4 단계. 그런 다음 체크 옵션을 선택하십시오.
5 단계. 화면에 표시된 지침에 따라 윈도우에서 감지된 오류를 찾아 수정하십시오.
6 단계. 컴퓨터 시스템을 다시 시작하고 문제가 해결되었는지 확인하십시오.
솔루션 3: 디스크 드라이브 업데이트
“디렉토리 이름이 올바르지 않습니다” 문제는 디스크 드라이버가 잘못되었거나 업데이트되지 않았을 때 발생할 수 있습니다. 그런 경우에는 디스크 드라이버를 업데이트하여 문제를 해결하려고 할 수 있습니다.
1 단계. Wins + R 키를 동시에 눌러 실행 창을 여십시오.
2 단계. 실행 창에 devmgmt.msc 명령을 입력하고 Enter 키를 눌러 장치 관리자를 실행하고 여십시오.
3 단계. 장치 관리자 창에서 디스크 드라이브를 확장하십시오.
4 단계. 외장 드라이브, USB 플래시 드라이브 또는 SD 카드를 마우스 오른쪽 버튼으로 클릭하고 드라이버 업데이트를 선택하십시오.
위의 단계를 수행하고 장치 드라이버를 업데이트하십시오. 업데이트 후 컴퓨터를 다시 시작하고 문제가 해결되었는지 확인하십시오.
솔루션 4: 새 파티션 만들기
때때로 할당되지 않은 공간을 사용하여 새로운 단순 파티션을 만들면 이 문제를 해결할 수 있습니다. 아래 단계를 따르십시오.
1 단계. 키보드의 Win+R을 눌러 실행 창을 여십시오.
2 단계. 이제 실행 상자에 diskmgmt.msc 명령을 입력하고 Enter 키를 눌러 디스크 관리를 여십시오.
3 단계. 할당되지 않은 공간을 클릭하여 새 단순 볼륨을 선택하십시오.
4 단계. 화면의 지시에 따라 나머지 단계를 완료하십시오.
5 단계. PC를 다시 시작하고 문제가 여전히 있는지 확인하십시오.
디렉토리 이름이 올바르지 않음 오류를 성공적으로 해결했으면 윈도우즈용 Bitwar Data Recovery 소프트웨어와 같은 신뢰할 수 있는 데이터 복구 소프트웨어를 사용하여 모든 데이터를 복구하는 것이 좋습니다.
데이터 복구 프로그램을 통한 데이터 복구
Bitwar Data Recovery 소프트웨어는 외장 하드 드라이브, USB 플래시 드라이브, 메모리 카드, SD 카드와 같은 모든 저장 장치에서 오디오, 비디오, 이미지, 문서 등의 소프트웨어 데이터를 즉시 복구할 수 있습니다. 이 소프트웨어는 사용하기 편리한 인터페이스를 갖추고 있으며 사용이 간편합니다.
Are you facing iPhone stuck on the iPhone Logo issue? You’d better learn something about how to fix iPhone stuck on Apple Logo and restore its data. Because the iPhone stuck on the apple logo often happens after iOS upgrade or iPhone jailbreak.
The iPhone stuck on Apple logo (sometimes, we call it white Apple) is a common problem that most iPhone users may meet. It may be caused by jailbreak or upgrade the iPhone, for those iPhone stuck on iPhone logo means you can’t use any of the functions, such as calling someone, shooting photos or sending text messages, etc.
When you attempt to start the device it still can‘t get out of the loop. It is harrowing. Here are some methods you can take to get your iPhone out of a startup loop.
Methods to Fix iPhone Stuck on iPhone Logo Issue.
Method 1. Restart the iPhone
The first thing you should try to resolve this problem is to restart the iPhone. Honestly, that won’t fix this particular problem in most cases, but so far it’s the most straightforward approach. If that doesn’t work, your next step is setting it without any data loss. Because in this case, a data recovery program is probably the only solution if you want to get your data back.
Method 2. Force restart
The following steps describe how to force-restart your phone apply to iPhone 4, iPhone 5 / iPhone 5c / iPhone 5s, iPhone 6 / iPhone 6s / iPhone 6 Plus white screen:
1. Press down on the Home button and the Power button simultaneously until the Apple logo appears. 2. Release the buttons and wait for your device to complete the starting. This process can take 10-20 seconds to complete. Patience is the key! 3. During the startup process, enter your passcode, regardless of whether you usually use your fingerprint for identification.
If you have an iPhone 7 / iPhone 7 Plus white screen, the steps to restart it are only slightly different. Please follow the steps described below:
1. Press and hold down on the power key on the side of the phone and the volume down crucial button simultaneously until the Apple logo appears on the screen. 2. The starting sequence shall begin. 3. During the process, enter your passcode, regardless of whether you usually use your fingerprint for identification. The iPhone should regularly work now.
For an iPhone 8 / iPhone 8 Plus / iPhone X white screen, the steps are much different:
1. Press the Volume Up button and release it quickly. 2. Do the same on the Volume Down button (press and release it immediately). 3. Press and hold the Power button (on the side) until you see the Apple logo.
Method 3. Put iPhone in DFU Mode to Get out of While Screen Death
If hard resetting the phone does not take care of the White Screen of Death issue, you may want to put iPhone into DFU mode. DFU stands for Disk Firmware Update and reinstalls the firmware on your iPhone. It can fix most of the issues related to iOS devices. Here are the steps:
1. Connect the iPhone to the computer via USB cable. 2. Press and hold the sleep/wake button for around 4 seconds. 3. Press and hold the Home button and power button together for approximately 10 seconds. 4. Release the power button but keep the Home button pressed for about another 5 seconds. 5. If your screen turns black from white, you have successfully entered the DFU mode. Now launch iTunes and restore your device using one of your backups.
Fix an iPhone Stuck on Apple Logo without any Data Loss
Once your iPhone stuck on the iPhone logo, you can’t restore your iTunes or iCloud backup in the usual way you ever used. And your data in your iPhone is vital that you don’t want to lose. In this case, you need Bitwar iPhone data recovery, which can easily extract data from your unreadable iTunes backup, no need to connect your device. This recovery program is specializing in restoring different phone contents like photos, messages, contacts, calendars, call logs, videos, and much more.
Note: You can recover data existing in the iTunes backup. You can also recover those deleted data, which can’t be restored directly from iTunes to your iPhone.
First, Install Bitwar iPhone Data Recovery on your Mac. iTunes can help Bitwar iPhone Data Recovery find the deleted data with more details.
Bitwar iPhone Data Recovery can directly detect whether iTunes is installed on the computer. If iTunes isn’t installed, it will download the installation components directly without installation. If there is an installation or a computer that has backed up Apple data using iTunes, it can directly select the feature to scan from the backup.
The first time to access the iPhone needs to install the necessary fruit and devices, with a time of 3-5 minutes, please be patient.
This article introduces how to format the disk and where do the formatted disk data go?
To format a hard drive means to delete any information on the drive and to set up a file system so your operating system can read data from, and write data to the drive. As complicated as that might sound, it is very common for Windows users. The time it takes to format a hard drive in Windows depends almost entirely on the drive’s size, but your computer’s overall speed plays a part, too.
Important: If the hard drive you want to format has never been used, or was just wiped clean, it must first be partitioned.
Any existing files on the drive would be erased with disk formatting. Disk formatting is usually done before the initial installation or before the installation of a new operating system. If the disk needs to be formatted, often you’ll face the following things:
Incompatible file system error
To clean install Windows OS on a hard drive
Hard drive corrupted, developed bad sectors, access denied due to the RAW file system
If there is a requirement for additional storage in the computer
Disk formatting can be performed on both magnetic platter hard drives and solid-state drives. The formatting comprises low-level formatting and high-level formatting. Low-level formatting aids in preparing the physical structure on the storage media. High-level formatting helps in creating the file system format within the logical volume or the disk partition. Both formatting solutions will erase hard drive data, so make sure that you have backed-up all important data.
How to Format Hard Drive from Command Prompt?
To format a hard drive using cmd via Command Prompt, use the disk part commands given below carefully. Try your best to avoid mistakes.
Step 1. In your Windows, type cmd in the search box, you can get the best match called Command Prompt. Right-click on it and choose Run as administrator.
Step 2. On the Command Prompt black window, type diskpart and press enter.
Step 3. Now type list disk and press enter. All the disk drives will be listed, including your external drives that connected to the computer.
Step 4. Refer to the list disk information, type select disk + disk number, for example, select disk 1 and press enter. You’re telling diskpart to format disk 1.
Step 5. Go on to type clean. This step starts to clean up all files and folders on the selected hard disk.
Step 6. Type create partition primary and press enter.
Step 7. After diskpart successfully created the specified partition, type format fs=ntfs (or format fs=exfat) and press enter. You’re telling diskpart to format the drive with a file system, let it be NTFS, exFAT, etc.
Step 8. At last, assign a drive letter to the newly created partition by typing assign.
That’s a complete guide of formatting hard disk with diskpart format commands.
How to Format a Hard Drive in Disk Management
Open Disk Management, locate the drive you want to format from the list at the top.
Once located, right-click or tap-and-hold on the drive and choose Format… A “Format [drive letter]:” window should appear.
Note: If you’re formatting a new drive, the drive letter assigned should be unfamiliar to you, and the File System will probably be listed as RAW.
For the Volume label: Textbox, either give a name to the drive or leave the name as is. If this is a new drive, Windows will assign the volume label New Volume. However, I recommend giving a name to the drive, so it’s easier to identify in the future.
For File system: Choose NTFS, NTFS is always the best file system option to use in Windows unless you have a specific need to choose FAT32. Other FAT file systems are only available as options on drives 2 GB and smaller.
Set the Allocation unit size: To Default unless there’s a specific need to customize it. There are very few reasons to change this.
The Perform a quick format option is checked by default. A quick format will format the hard drive considerably faster than a standard format, so you don’t have to modify it.
The Enable file and folder compression option is unchecked by default. Most drives are so large today that the tradeoff between the saved space and lower drive performance probably isn’t worth it. So I recommend keeping it that way.
3. Tap or click OK at the bottom of the window.
4. Tap or click OK to the “Formatting this volume will erase all data on it. Back up any data you want to keep before formatting. Do you want to continue?” message.
5. The hard drive format will begin. You can keep track of the drive format by watching the Formatting: xx% progress in the Status field.
6. The format is complete when the Status changes to Healthy.
Whether from the command line or Disk Management, you can successfully format your disk. You can choose the one you like.
Before the article, we said formatting solutions would erase the disk data completely, so when your data lost in formatting operation, you should recover it from the formatted disk promptly.
How to recover formatted disk data?
We recommend that you choose Bitwar Data Recovery, which is the best data recovery software. You can recover data from formatted hard drive, memory card, USB flash drive, digital camera, camcorders, and so on.
Free download Bitwar Data Recovery on its official website and install it on your computer. Please don’t save any file or program to the formatted disk which you want to recover data from.
With the full name of “Secure Digital Card,” SD Card is a type of memory card that is typically used in media devices. Such as Android mobile phones, digital cameras, and other portable devices. But there will be a variety of problems, such as SD card data loss, SD card cannot be read, or SD card corrupted case and so on. This article will show you some practical methods to fix the SD Card can not work problems.
1. Use the CMD command or Windows System Tool
Fix 1: Change the Drive Letter
In some cases, If your SD card can’t be read by a computer when connecting via a card reader, it could be that the computer is unable to assign drive letters (like C, D, E) to the reader.
1. Connect your SD card via a card reader to your computer. Right-click on “My Computer/This PC” and choose “Manage.”
2. Click “Disk Management” on the left. Right-click on your SD card and choose “Change Drive Letter and Paths.”
3. Then select the right drive letter from the drop-down list. Click “OK” and then see if the SD card can be recognized now.
Fix 2: Reinstall the Drivers
There are times when the drivers run your SD card that gets corrupted and your PC is not able to detect the storage media. You can reinstall drivers by following these simple steps:
1. Right-click “My Computer/ This PC”. Click “Manage.”
2. Click “Device Manager” on the left side.
3. Double-click “Disk Drives” in the list. Right-click on the name of your pen drive.
4. Click “Uninstall”. Click “OK”.
5. Disconnect your storage media and restart your PC.
6. Connect your pen drive again. Your PC will detect it and install it.
Fix 3: Recover a corrupted SD card by using the CHKDSK command
By using the Command tool, the Windows computer can execute the Chkdsk command and fix the corrupted SD card.
1. Click on the “Start” button, select the “Computer” option. Search for your SD card under “Devices with Removable Storage” and note the assigned drive letter.
2. Click on the “Start” button, in the search box, type “cmd”.
4. Right-click “cmd.exe” and then select the “Run as administrator” option.
3. In the newly-opened command window, type the command: chkdsk [sd card drive letter]: /f /r /x and press enter.
Fix 4: Format Corrupted SD Card
Formatting an SD card will erase all contents stored in the card. If you have backed up and recovered the data on the Corrupted SD Card, you can try to repair the corrupted card by formatting it so that you can continue to use it. here are the ways to format an SD card in windows system environment:
1. Open”My Computer/This PC” and right-click on your SD card.
2. Choose Format in the drop-down menu. When there is a pop-up window, click “Restore Device Defaults” > “Start.”
3. If you want the computer to be deep scan the card, uncheck the Quick Format option.
2. Recover the corrupt SD card with Bitwar recovery software.
The most important thing you should know is to stop using the corrupted SD card until you can recover all the data you still need. Once the card is overwritten, the data will be deleted automatically.
Firstly, try to fix the accessible matter with the methods mentioned above. Once you can enter in the SD card, data recovery software scans the SD card and retrieves all your precious files, photos, videos, audios, etc.
Free download and then install Bitwar Data Recovery Software on your computer. For the SD card, you will have to insert it into the slot that provided in your computer or by using an external card reader.
As a backup device for smartphones, the iPad has become more and more indispensable in our lives. People like to save and store critical data, such as photos and videos on their iPad. However, many iPad users may experience accidental data loss for versatile reasons. Later they may realize the lost data are important. You might want to ask how to recover deleted photos from iPad free to rescue your data. To do you a favor, we would like to introduce a reliable iPad data recovery software that you can always count on.
There are a number of reasons why data on your iPad can get lost: accidental deletion, failed iOS upgrades, factory settings, system crash, and device damage, etc. When it comes to recovering deleted or lost iPad data, two solutions are available: restore from backup or recover with iPad recovery software.
You may have made an iTunes or iCloud backup before and 100% sure the backup contains the lost data. So you can recover lost data from the backup. However, the security from iCloud recovery is poor, and if iCloud backup exceeds a certain amount of storage space, then it will ask for charges. And recover from iTunes backup is less stable and error-prone. Most importantly, recover from iTunes requires all data to be restored back and you don’t have the choice to make a selective recovery.
Fortunately, taking advantage of iPad data recovery software is the last yet only way for you to get back lost data on iPad.
For an easy and efficient iPad data recovery, Bitwar iPhone Data Recovery software is recommended. It is a software program designed for the IPad/iPhone/iPod recovery, which developed to recover lost data from iOS devices, you can easily recover the data by only three steps, even if you are not familiar with computer operations. It can recover the lost data of iPhone/iPad/iPod, including photos, videos, contacts, messages, notes, call logs, bookmarks, reminders, and calendar, etc. It compatible with iPhone 4/5/5c/5s/6/6s/6 plus/6s plus/SE/7, iPad Pro/Mini, iPod Touch 4/5 and more iDevice running iOS 11/10/9/8/7.
Preparing the Environment to Recover Data from iPad
Install Bitwar iPhone Data Recovery
Bitwar iPhone Data Recovery software supports two operating systems: Mac OS and Windows OS. You can download and install Bitwar iPhone Data Recovery or Bitwar iPhone Data Recovery for Mac version according to your computer system.
Steps to Recover Lost Data from iPad:
1. Recover from iOS Device
You can recover them after your iPad lost data, and you do not need to back up the iPad in advance.
Step1: Launch Bitwar iPhone Data Recovery and Connect iPad to the Computer
Launch Bitwar iPhone Data Recovery and connect your iPad to the computer through the dedicated USB cable. Make sure iTunes is installed previously. Select the default recover mode “Recover from iOS Device”.
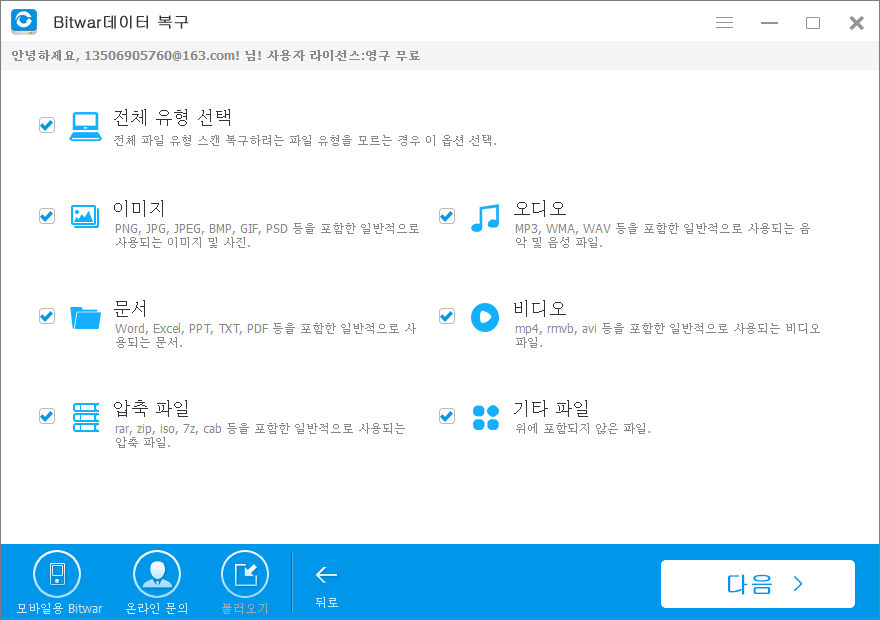
Step2: Select the file type
After the program has identified your iPad, the program will ask you to select File Types. Select the types of files you want to recover, and Then click “Start Scan.”
The software will quickly scan the device to find all the existing and lost data. You should keep the device connection during the scanning operation.
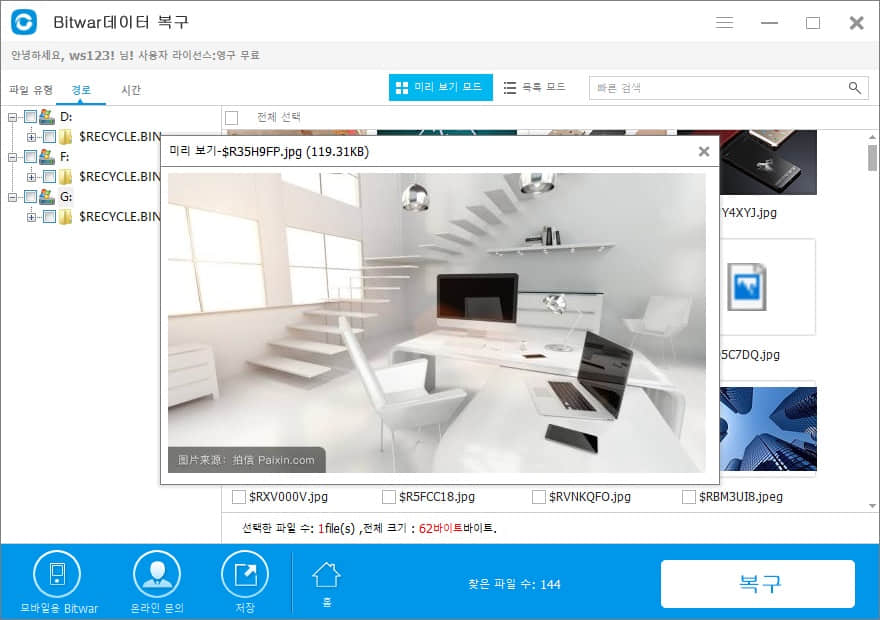
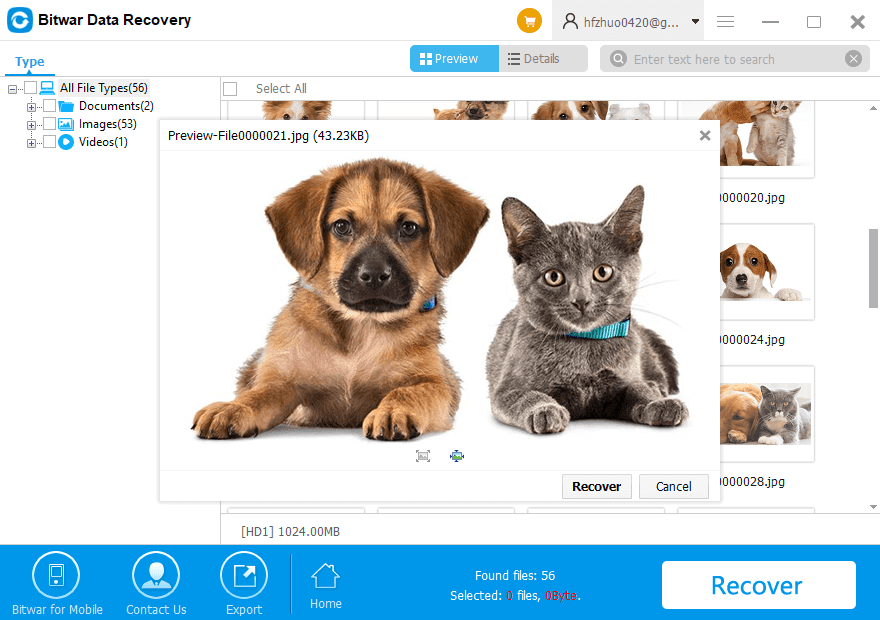
Step3: Preview and recover data from iPad
When the scan is finished, you can click the types on the left side, then preview the detailed contents to find your target data. Mark them which data you want and then click “Recover” button to save them on your computer.
All the data can be found after followed the above steps, including the data you deleted and those still on your iPad.
It is hard for everyone looks for specific pages in a large PDF file since users can’t edit the PDF file. Sometimes only a few pages of the PDF file are needed for some users, so users need to extract pages from PDF file to make the work more accessible and efficient.
Many users will use Adobe Reader to extract PDF pages from PDF file, but it can be costly if you don’t have the software on the computer so we will show you the most effective and professional way!
Split PDF to Extract Pages From Pdf File
The most straightforward way for users to do it is by using Split PDF from PDF Converteras the steps below:
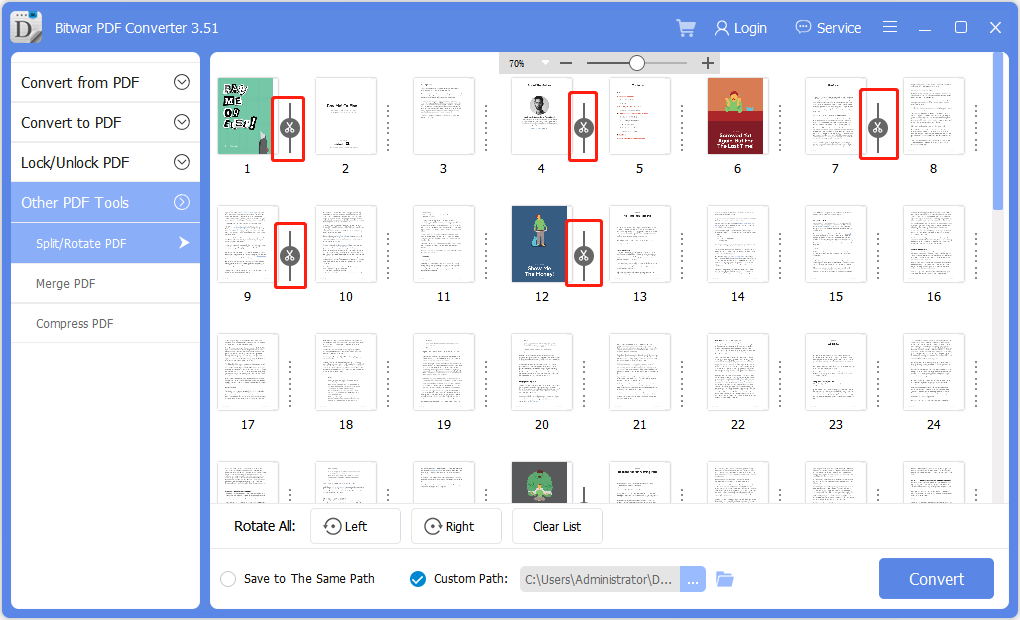
Step 1: Launch Bitwar PDF Converter and choose the Split PDF tool from the Other PDF Tools menu.
Step 2: Upload the PDF file and select the PDF pages that need to be extracted.
Step 3: After selecting the pages, click Convert to start extract PDF pages and tap on Open Files to preview the new PDF pages.
Merge Page Into One PDF File
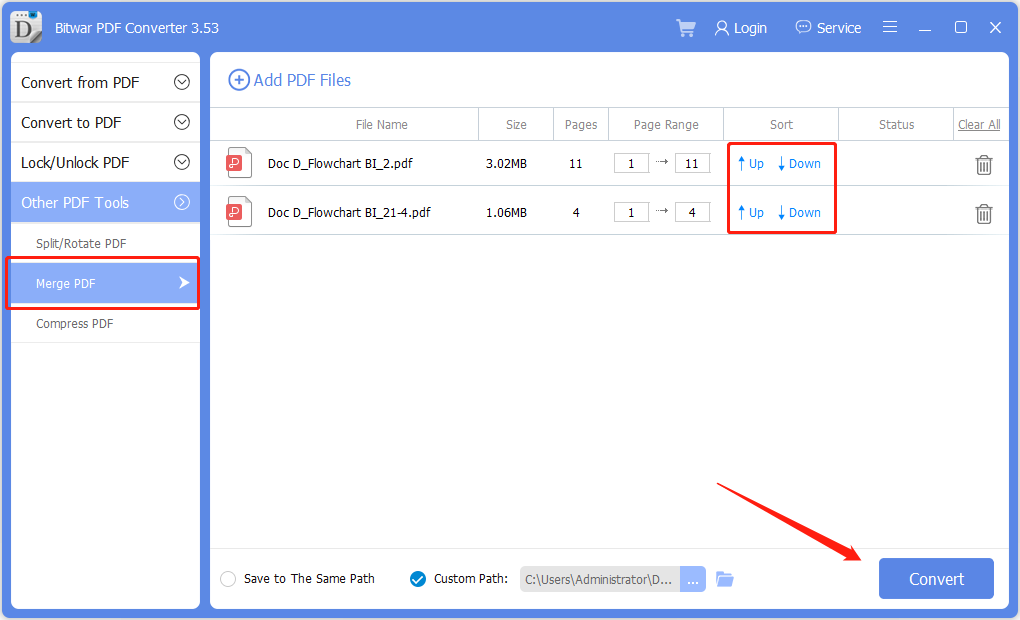
In case you need to merge the pages into one new PDF file after extracting the pages from the PDF, users can use the Merge PDF tool from the same PDF Converter to merge pages.
Step 1: Choose Merge PDF tool from the Other PDF Tools menu and upload all the PDF pages into the software.
Step 2: Sort the page up or down to rearrange the page number and tap Convert to the start the conversion.
Step 3: Finally, click Open files to preview the new PDF file!
After the merging the PDF files, users can also use the Convert PDF tool in the software to convert PDF to Word easily or image for other essential or necessary situation too. Besides, if the new PDF file size is too large, you can use the Compress PDF tool to compress the PDF file for sharing and storage.
Learn It Now!
All users don’t need to use Adobe to extract pages from PDF since there is an alternative way to do it. Therefore, users can start using the reliable PDF Converter and explore all the PDF tools provided it is free for all users to use!