Fix the SD Card Cannot Reading Issue

Summary:

This article introduces solutions to fix the SD card not reading issues and offers an excellent SD card recovery method for you.

Many users are complaining that their SD Card has regularly “being on strike,” but why? We know that the SD card is famous for its convenient and inexpensive storage space. It is universally used in camcorders, music players, Android smartphones, tablets, digital cameras, and other portable devices. However, the SD card cannot read is definitely uncomfortable. Can we fix it without paying too much time and money? Yes, please read this page to recover your SD card free.

Tip: When you repair an SD card that cannot read, and if you worry about a data loss disaster, download the best SD card recovery software to recover the critical data first.

How to recover data from a not reading SD card?

If you are worried about how to retrieve your data, don’t worry and your best shot is to let Bitwar Data Recovery help you. It is a fast, reliable and free data recovery software. You can recover audios, videos, pictures, archives, compress files, and documents. 

Free download and then install Bitwar Data Recovery Software on your computer. Then insert your SD card into the slot provided in your computer or by using an external card reader. No matter what the commander prompts, make sure the computer recognizes it.

Steps to recover data with Bitwar Data Recovery?

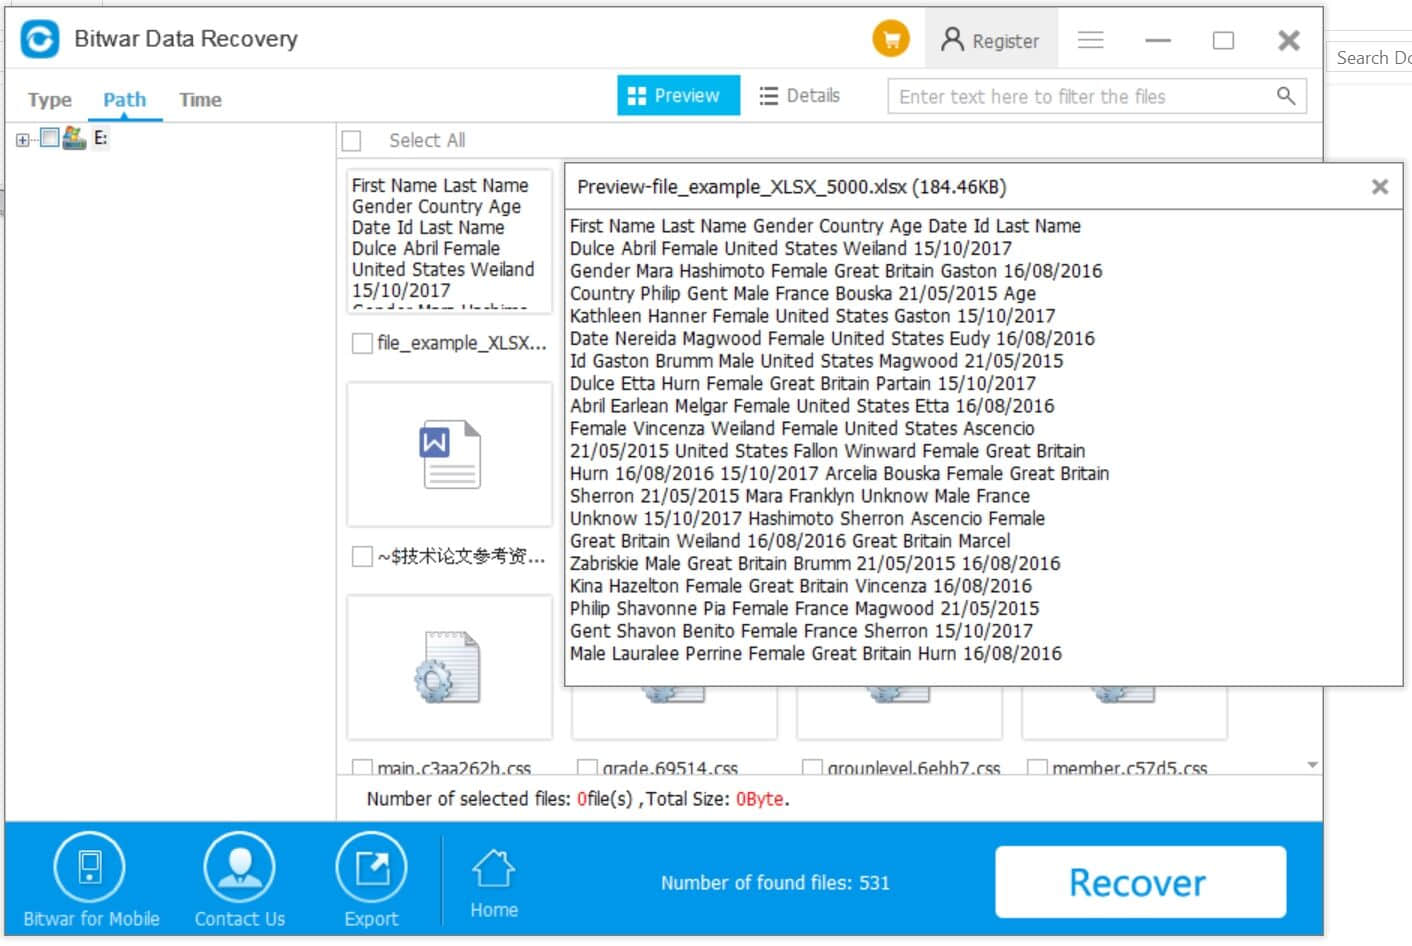
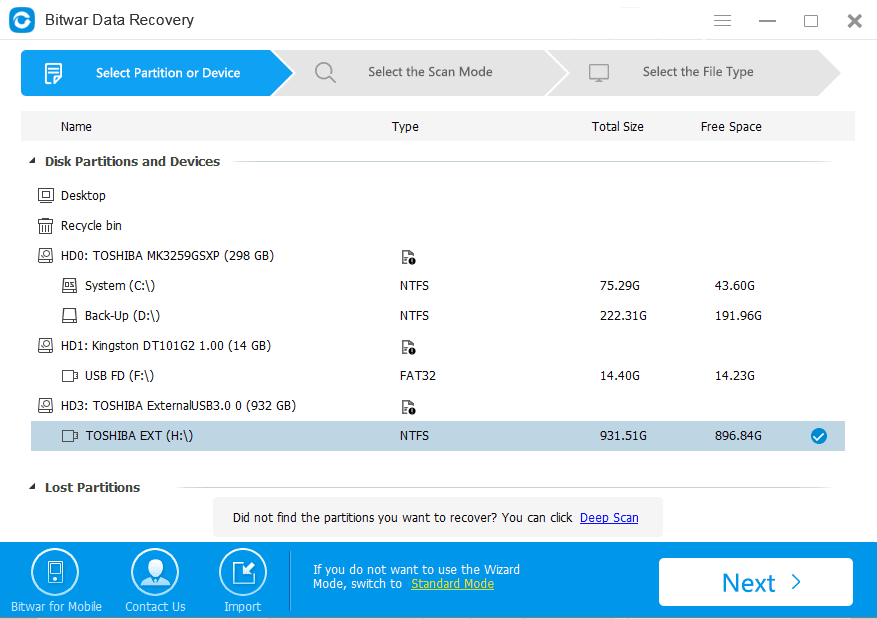
● Step 1: Launch Bitwar Data Recovery software on your windows and select the SD card and then click “Next.”

● Step 2: Choose “Quick Scan” mode to scan the SD card first, If you cannot find files on this mode, try Deep Scan.

sd card not reading

● Step 3: Select the file types you want to recover and then click “Next” to start scanning.

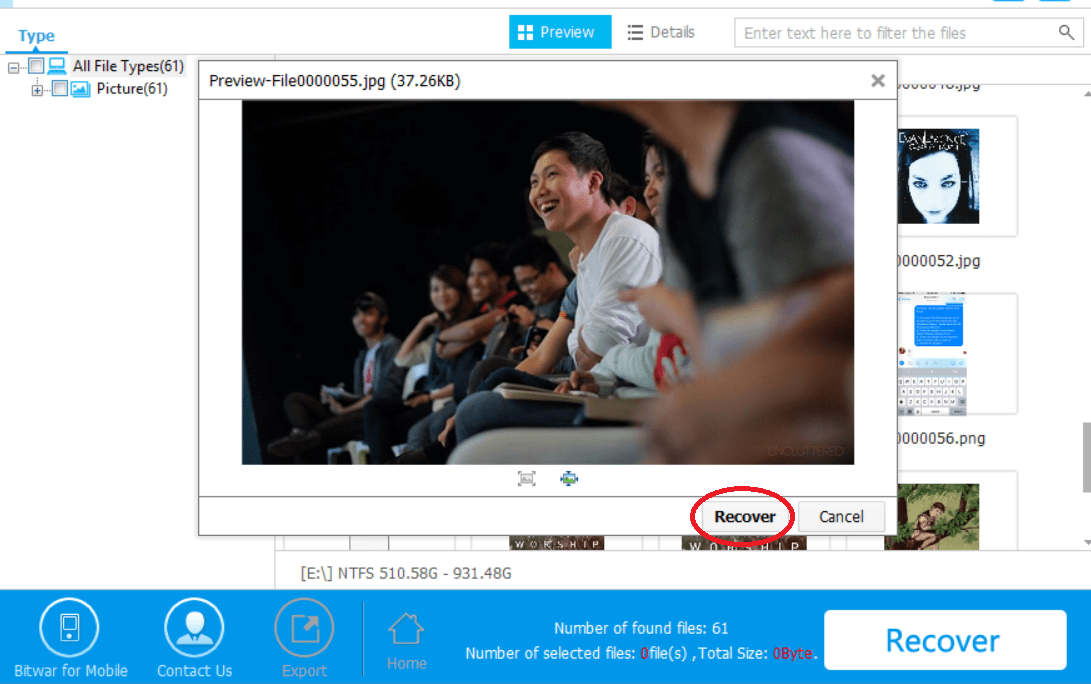
● Step 4: After the scan, you can preview and select the ones you want, and click the “Recover” button to save it to hard disk or other external devices.

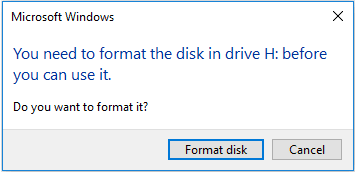
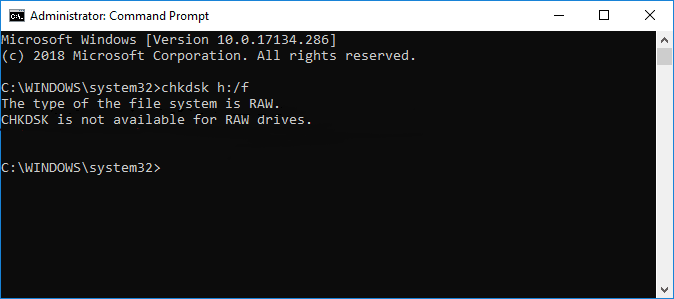
How to fix the SD card not reading?

Method 1: Try to use SD Card on another device

Just in case, insert the SD card to other mobile device or connect it to other PC to see if it works. Usually, a new card will incompatible with your device for the first time.

Method 2: Change the drive letter

In some cases, if your SD card can’t be read by a computer when connecting via a card reader, it could be that the computer is unable to assign drive letters (like C, D, E) to the reader.
 
1. Connect your SD card via a card reader to your computer. Right-click on My Computer/This PC and choose Manage.
2. Click Disk Management on the left. Right-click on your SD card and choose Change Drive Letter and Paths.
3. Then select the right drive letter from the drop-down list. Click OK and then see if the SD card can be recognized now.

Please refer here for more about data recovery.

Fix “The Disk You Inserted was Not Readable by This Computer” on Mac

Summary

The disk you inserted was not readable by this computer” error message generally occurs when you access an external hard drive on Mac. But don’t worry. This page offers 6 easy and efficient methods to fix the error. Download Bitwar Data Recovery for Mac to help if necessary.

When you get the message “The disk you inserted was not readable by this computer”, you will be unable to access the data in th2 drive. Actually, “the disk you inserted was not readable by this computer” is one of the most common errors that Mac users have met. Many reasons can cause such the error, including virus infection, file corruption, internal file system errors, faulty connections, Mac malfunctions, upgrading Mac OS, as well as drive corruption. But don’t panic, just follow the instructions below to fix the problem.

6 Solutions to Fix "The Disk You Inserted was Not Readable by This Computer"

Solutions to fix “The Disk You Inserted Was Not Readable by This Computer” on Mac

Solution 1. Check the Mac computer

Just connect a different storage device to Mac, if you can see it in Finder, the problem may refer to the external device. So try re-connecting the external device to Mac. Just remove it safely from Mac and then re-plug it. Then, attempt to access it to see if the error persists. If this error still pops up, you could move on to try other ways.

Solution 2. Check the file system format

Check the detailed information of the external device. If it is the file system that Mac isn’t compatible with, you can understand why it is unreadable on High Sierra. In this situation, to fix “disk is unreadable” error, you can change its file system.
 
After the above some basic checks, if error “the disk you inserted was not readable by this computer” still occurs, you should recover the data from the error disk first. Because the solutions next will delete or overwrite the data on the disk,

Solution 3. Repair unreadable external device in Disk utility

You can use the Disk Utility built-in Mac to do a disk repair. Disk Utility allows you to format, manage and repair the disk. It’s helpful for you to fix many drive issues including the “The disk you inserted was not readable by this computer” error.
 
Disk Utility’s “First Aid” is a Mac built-in tool to verify and repair certain disk problems.
 
Step 1: Launch Disk Utility.
Step 2: Select the unreadable drive on the left side.
Step 3: Select the “First Aid” tab.

6 Solutions to Fix "The Disk You Inserted was Not Readable by This Computer"

Step 4: Click Repair Disk at the bottom of the screen.

6 Solutions to Fix "The Disk You Inserted was Not Readable by This Computer"

Step 5: After repairing finishes, check to see if Mac reads your external drive.

If Disk Utility reports that the disk appears to be OK or has been repaired, you’re done.

Recover data from the unreadable external drive

You need to recover important data from unreadable external drive if you’re not sure what third-party data recovery program you can trust, you can do it with Bitwar Data Recovery for Mac. It is a reliable & easy-to-use data recovery software that can recover data from unreadable external hard drive, hard drive, USB flash drive, SD card, memory card, digital camera on Mac OS. To recover the corrupted files, you just need a few clicks:

Install the Bitwar Data Recovery for Mac

Free download Bitwar Data Recovery for Mac, then install it on your Mac OS. This software is compatible with OS X 10.11 and later.
 
Tips: For the latest macOS 10.13 (High Sierra) system requirements, Mac users are not allowed access to system disk from apps. If you want to recover data from the system disk, please disable the system feature “System Integrity Protection (SIP)”, and see the guide on How to Disable System Integrity Protection (SIP) in macOS High Sierra (macOS 10.13)

Steps to recover data from External Hard Drive on Mac

Step 1: Select the External Device

Launch the program and connect your external device to the mac, and make sure your Mac recognizes it. Then select it and click “Next”.

Please refer here for more about data recovery.

Best 5 Data Recovery Software Alternatives

Summary: Recuva is guaranteed the most popular data recovery tool with its free excellent service for Windows PC. Sadly, Recuva for Mac is not available.  But lost no hopes! This article will provide you with the best Recuva Alternative for Mac.

When files are deleted, formatted and/or corrupted from a flash drive, memory card or hard drive, digital camera, and MP3 Player, Recuva will be one of the best options that run on Windows-based computers to recover lost data.

Since Recuva for PC is 100% free that makes it popular; however, Mac users have to look for other best Mac data recovery software, as Recuva for Mac isn’t available right now.

Top Recuva Alternative for Mac

Finding Recuva alternative for Mac is actually not that hard, the internet will offer numerous recovery tools with just swift search in Google, but we will not make your life harder; here are some of the best Mac data recovery tools that you can choose to use.

1. Bitwar Data Recovery for Mac

Recuva-for-Mac-Bitwar-Data-Recovery

Bitwar Data Recovery is the best file recovery software for Mac and PC.  It recovers data from accidental deletion, improper formatting, with just a few clicks, you can retrieve the document, video, audio, archive files, photo from Mac, hard drive, external hard drive, digital storage medium, and memory card.

And there’s no need extra computer skills while operating the software, easy-to-use software interface contains the clear enough steps and full descriptions of the functions, which will also guide you understand well how to go next.

In addition to that, to recover lost data, Bitwar Data Recovery for Mac only takes you 3 steps. Select a device or drive that contains your lost data, and then choose a recovery mode (Quick Scan, Deep Scan or Formatted Recovery) and your desired file types (e.g. a document or photo). After scanning, you can then preview the data, click the Recover button to save the data to a different location.

Read More: Top 10 data recovery software for Windows

2. EaseUs Data Recovery for Mac

Recuva-for-Mac-Easeus-Data-Recovery

EaseUs Data Recovery Wizard for Mac offers 3 easy steps to recover data from Mac. In addition, there’s no need expert skill while using the software, when data loss happens, you can use it to recover data from some simple data loss situations, generally, the pro version charges up to 299$ which is considered a bit expensive.

3. Disk Drill for Mac

Recuva-for-Mac-Disk-Drill

Disk Drill for Mac provides 3 modes to scan the lost data from the internal Macintosh hard drive, USB flash drives, and memory cards, etc. Its design is good looking with strong features, such as data protection vault, you can easily use this software to scan and preview, still, the downside is the recovery rate isn’t that good according to its user reviews. The pro version pricing ranges from $89-$399.

Pleas refer here for more about data recovery software.

Fix on Diskpart Delete Partition

Summary:

Sometimes, people may use diskpart delete partition for better management. However, where did the data in the deleted partition go? How can I get the data back? This article will tell you how to recover data from deleted partition.

https://www.bitwar.net/data-recovery-software/

All file storage devices, including the partition of the hard disk, external hard drives, USB flash drives, SD cards, memory cards, are vulnerable and prone to be deleted. In addition to the accidental deletion of partitions, you can also use the Diskpart command to delete the partition.
 
Diskpart is a useful system utility to create, format, resize or delete partitions as well as helping to fix partition.

Using the Diskpart to delete the partition

Diskpart is a disk management tool snap-in Windows, It executes tasks by using the command line (CMD). Diskpart delete partition is a good way to delete the partition with the syntax:
 
1. Open the Command prompt, type: diskpart.
2. At the diskpart prompt, type: list disk. Then, all the disks on your computer will be list, you should figure out the disk number of the disk from which you want to delete the partition.
3. Type: select disk n. “n” is the disk number. Select the disk which contains the partition you want to delete.
4. Type: list partition
5. Type: select partition n, “n” is the partition number. Here you need to select the partition which you want to delete.
 
6. Type:delete partition. Then, delete the partition using Diskpart will be shown as the following screenshot shows:

Anyway, deleting partition or formatting partition causes data loss. So do not try diskpart command until you have fully backed up files on the hard disk. And if you delete the partition by mistake, you should turn to data recovery as soon as possible.

How to recover data from deleted partition?

Bitwar Data Recovery is a powerful and effective data recovery software that can restore lost data causing by deleting, formatting, partition deleted, virus attacking, system crash or other unknown reasons under Windows 10/8/7, etc. Only 3 simple steps are needed to restore lost data.
 
Free download and install Bitwar Data Recovery Software on your computer: https://www.bitwar.net/ . It’s quick and convenient.

Read more? Please refer to:

Quick Fix on Diskpart Delete Partition

Where are Photos Stored On Mac and How do I Find All Photos?

Summary: Can’t find your photos on Mac? This article describes where are photos stored on mac and how to find missing photos.

https://www.bitwar.net/data-recovery-software/

One of the biggest conveniences that you can have in a MacBook or iMac, is using a clear and crisp webcam for different occasions. Such as, making video calls with friends or even with colleagues from work. Or, you can even just use it for taking photos to create memories.

Questions you might also ask

Perhaps that last mentioned reason is what you would do more. And you are wondering how to find photo files or albums on Mac. Well, you are not alone. We found the questions similar likes yours: where are photos stored on Mac High Sierra, El Capitan, on MacBook Air, etc.

Some others also ask, how do I find all the photo files on my Mac? Where is my pictures folder on mac? Where are imported photos stored on mac?

If you have questions like these, please read on and get ideas on how to.

How do I find all the Photos on My Mac?

To be honest, finding the photo files themselves can be quite the trick in Mac. For managing photos that you even have imported from an iOS device such as an iPhone or iPad, you will most likely find it in Photos app. But as for the image files themselves, you can not find them in this app, will you?

These image files are compiled into one file (or you can even call it a library or folder with a different format) readable through certain apps and platforms such as the Photos app and the iCloud Photo Library. You will need to follow some steps to visit Mac photos file location. Ready?

Find Mac Photos file Folder

  1. Open Finder and go to Home Directory.
  2. Open Pictures folder.
  3. Right click on “Photos Library.photoslibrary” and click “Show Package Contents”.
  4. Open “Masters” folder.

Did you see what just happened?

As you might figure out, Mac does not intend to let users access the folder directly. That’s why you can’t find pictures folder on Mac, but using this method, you will see your photos in their respective image files, organized in subfolders according to the creation or saved time.

When you find the folder, you can freely do with the photos as you please. Just note that any deleted files in these folders will also stop appearing in the Photos app.

In addition to that, there are other people also asking how to organize photos on Mac without iPhoto. Well here’s the answer. With access to this folder, you can make a folder on Mac, and put photos into that folder.

How to Find Missing Photos on Mac

You may also encounter the problem that there are no pictures on the folder on Mac, or at least the pictures that you are looking for. The folder itself could be missing altogether. The files and folders that you are looking for could be missing due to deletion or some error made by your computer.

Where did my photos go on my Mac? Don’t panic. You still have a chance of finding those files and recovering them. All you would need is a third-party software called a data recovery software.

A data recovery software scans your whole Mac hard drive for files (yes, even those that were deleted in the past and those that are missing). For deleted files, this is still very possible as long as the data in them are still not overwritten with new files. Let’s hope they are not.

First, you need to install Bitwar Data Recovery for Mac. This is one of the best and easiest to use data recovery software today, having only three simple steps in recovering your files.

Once you have downloaded and installed Bitwar Data Recovery and have created an account, you can start to recover photos with the three-step data recovery process.

Step 1: Select Drive or Partition

After launching the software, the software will detect all of your devices or drives and shows them in the list, such as Mac hard drive, external hard drive, Thunderbolt, SD card, etc. Choose your hard drive and click Next to move to the next step.

001-Select-partition-1

Step 2: Select Scan Mode

There are three possible scan modes for Bitwar Data Recovery. The first mode you should go for is the Quick Scan. Using this scan mode, you can hopefully get back your files in their original version.

If you cannot find your files using Quick Scan, you may try Deep Scan. This one performs a more thorough search of the hard drive, but you will see that the files are not in their original file names, but rather generic ones.

Last but not least, the Formatted Recovery scan mode can scan lost files after formatting.

READ MORE: HOW TO RECOVER DATA FROM FORMATTED HARD DRIVE ON WINDOWS OS.

How to Unlock iPhone 6 for Use without Losing Data

Summary:

Forgot your passwords of the iPhone 6? Here you can learn how to unlock iPhone 6 for use without losing data. Just follow to unlock/enable disabled iPhone and get all data back now.

https://www.bitwar.net/ios-data-recovery-software/

In general, if your iPhone 6 is locked, you can use a passcode to unlock it. However, if you repeatedly change the passcode, the worse situation is you may forget the iPhone passcode, or in some case, you’ll not know where to start.
 
It is probably the most frustrating thing when you are entirely locked out of the iPhone. To unlock iPhone 6, you can restore your iPhone to factory settings, or contact your carrier to make sure that they applied the unlock in their system. Or you can also restore your iPhone from a backup.

Unlock iPhone 6 with resetting it to factory settings

Resetting the factory settings clears the data and settings on your iPhone, and it will unlock.
 
1. Make sure you have the latest version of iTunes installed on your Mac or PC. If you want to save the information on your iPhone, iPad, or iPod, please make a backup.
2. Go to Settings > [your name] > iCloud, click Find my iPhone, then turn it off.
3. Restore your device to factory settings
4. Open iTunes on your Mac or PC and connect your iPhone 6 to your computer using the cable that came with your device.
5. If the message asks for a device password or trusts this computer, follow the steps on the screen.
6. When your iPhone 6 appears in iTunes, choose it.

iTunes

7. In the Summary panel, click “Restore [Device].”

Restore Device

8. Click “Restore” again to confirm. iTunes will then delete your device and install the latest iOS or iPod software.

Restore

9. After restored to factory settings, the device will be restarted. Now you can set it to new.

Unlock iPhone 6 through Find My iPhone

Supposing that you’ve enabled Find My iPhone in iCloud, then follow these steps to erase your device and passcode.
 
1. Go to icloud.com/#find from another device or computer.
2. If prompted, sign in with the iCloud Apple ID.
3. Click All Devices at the top browse window.
4. Select the device which you want to erase. If you can’t find your device on the list, you should use Recovery Mode.
5. Click Erase iPhone (iPad or iPod touch) to remote wipe the device and its password. (The device itself needs to connect to the network).
6. Now your iPhone 6 has been unlocked.

Erase iPhone

Fix Disabled or Locked iPhone 6 with Recovery Mode

In case you’ve never synced your iDevice with iTunes or set up of Find My iPhone. You should force your device into Recovery Mode to erase all content as well as its passcode.

1. Ensure that your device is not plugged into anything.
2. Hold down the sleep/wake button of the iOS device, then “Slide to Power Off” to turn off your iDevice.
3. Press and hold the home button while plugging iDevice back into the computer.
4. Keep holding the home button until you see the connect to iTunes Screen.
5. When you see the option to Restore or Update, choose Restore. If the process starts downloading the update file and takes more than 15 minutes, your device will exit recovery mode, and you’ll need to repeat the procedure.

How to Recover Lost Data from iPhone 6

Now if you have lost data from the iPhone 6. You can restore it from a recent iTunes backup. If there is no backup, install Bitwar iPhone Data Recovery to perform data recovery. With it, you can recover the lost data of iPhone/iPad/iPod, including photos, videos, contacts, messages, notes, call logs, bookmarks, reminders, and calendar, etc. by only three steps
 
Download and Install Bitwar iPhone Data Recovery on your Mac or Windows. iTunes can help Bitwar iPhone Data Recovery to find the deleted data with more details. So first, Install iTunes and Bitwar iPhone Data Recovery on your Windows or Mac by clicking the icon below.

Download Bitwar iPhone Data Recovery:https://www.bitwar.net/ios-data-recovery-software/

Tip: Bitwar iPhone Data Recovery can directly detect whether iTunes is installed on the computer, and download the installation components directly without installation. If there is an installation or a computer that has backed up Apple data using iTunes, it can directly select the feature to scan from the backup.

The first time to access the iPhone needs to install the necessary fruit and devices, with a time of 3-5 minutes, please be patient.

Download

Steps to Recover Lost Data from iPhone:

Step 1: Launch the Bitwar iPhone data recovery program and connect iPhone 6 to the computer via a USB cable. Select the default recovery mode “Recover from iOS Device” and wait for the program to identify the connected iPhone.

Read more? Please refer to:

How to Unlock iPhone 6 for Use without Losing Data

Stop Windows Detected a Hard Disk Problem

Summary: This article contains step-wise solutions on how to fix “Windows detected a hard disk problem” error on internal or external hard drive. Whenever a problem with the hard drive has been detected, don’t panic, read on below tutorials to repair disk errors to save your data!

https://www.bitwar.net/data-recovery-software/

Facing hard disk failure message such as “Windows detected a hard disk problem” on Windows 7, 8, 10 that causes quiet frustration and it has been a wide-spread problem of many Windows users.

error-message-2

This error is generated if the operating system is damaged by the risk of losing your data. Before diving to any solutions, it would be better to first identify the reasons for hanging the hard disk problem.

Windows Detected a Hard Disk Problem Backup Your Files Immediately

We all know that when a hard disk problem occurred, the hard disk becomes inaccessible, thus, if you want to secure your data, you can always rely on Bitwar Data Recovery for Windows or Mac.

It’s professional data recovery software that helps you recover data from inaccessible hard disk, formatted partition or even can recover data from lost partition.

008-Recov

The software offers easy steps to recover lost data, firstly, select device or drive where you have lost data, secondary, select a recovery mode and choose your target recovering file types (e.g. document or photo). Thirdly, scan and preview the data, and then hit the recover button to save the data into different device or partition. That’s all.

How to Repair Corrupted Hard Disk after Encountering “Windows Detected a Hard Disk Problem”

Fix 1. Utilize System File Checker

What is not known by many users is that Windows offers basic tools to fix hard disk error windows 10. The key is users have to find out which system file is damaged and this can be fixed with System File Checker.

Step 1. Go to Start Menu, type “cmd” to open Command Prompt.

Step 2. Right-click and hit Run as administrator.

Step 3. In Administrator: Command Prompt window, type “SFC /Scannow” and press Enter.

administrator-cmd

The processing will not take too much longer. This will give you a quick result whether there is interiority violation since the process includes scanning all protected files and replace corrupted files with backups copies. Make sure to complete the verification before closing the window.

Read more? Please refer to:

How to Stop Windows Detected a Hard Disk Problem

Recover Excel Files from Windows

Summary:

Don’t worry if you accidentally deleted important files such as Excel files from windows, this article will guide you step by step to recover Excel files.

https://www.bitwar.net/data-recovery-software/

Microsoft Excel is a popular software application as part of MS office. It is used by people all over the world for data manipulation, data analysis, and sorting. However, people often lose their excel files because of a wrong deletion, system crash, virus attack, or any other reasons. And they always forget to make backups. Once the critical excel files are lost, they might think that they have no chance to retrieve it.
 
We know that when files are accidentally deleted, the first thing you may do is to select the file and right-click on the mouse to press the delete button. Congratulations, if you’re doing it like this, you can find it in the recycle bin and right click on the mouse to restore it. And you can find it on the original folder where it deleted. But sometimes you permanently delete the file by pressing shift + delete at the same time on the keyboard, the deleted data is not found in the recycle bin. Where do the lost files go?
 
When we permanently deleted data from the disk, in its storage space, the operating system only mark a “deleted” sign on the data, and also marks the data occupied disk space as “idle.” At this time, although we can’t see this file, it still stays there. As long as no new files are created or new data is written within the storage space, the deleted data will remain there.
 
Therefore, you should not save data or write new data to the partition or device where the excel file is deleted. Use the powerful data recovery software – Bitwar Data Recovery to rescue the accidentally deleted excel file as soon as possible.  

How to recover deleted Excel files

Bitwar Data Recovery software is a totally clean, safe, and user-friendly tool. It doesn’t require any data recovery knowledge or experience to operate the software. More importantly, it is mighty, and effectively, it supports to recover data for sudden deletion, formatting, hard drive corruption, virus attack, system crash under different situations.
 
Free download Bitwar Data Recovery software and install it on your Windows. Mac users should download and install Bitwar Data Recovery for Mac version. Then follow the steps guide to recover deleted excel files.

Step 1. After installing the Bitwar Data Recovery program, launch it and select the partition or device where you deleted excel files and click “Next.”

Step 2: Select “Quick Scan” if you lost them by accidental deletion, and then click on the “Next” button. If Quick Scan couldn’t work to find lost photos, try Deep scan.
Tips: “Formatted Recovery” is using to recover data that formatted improper internal hard drives or external devices. If you lost pictures by formatted your disk, you should choose “Formatted Recovery.”

recover Excel files

Read more? Please refer to:

How to Recover Excel Files from windows

The Best Hard Disk Recovery Software

Summary

When you realize you need a file, you accidentally found it deleted and already emptied the recycle bin. It’s embarrassing. How to recover it as fast as you can? All you need is the best hard disk recovery software.
 
You must have many questions about hard disk data recovery. 

https://www.bitwar.net/data-recovery-software/

Why the hard disk data can be recovered?

For a traditional hard disk drive (HDD), when you empty the Recycle Bin or delete some items out of it, you don’t really delete the items. Speaking from a technical viewpoint, when you store or generate files on your computer, they are actually saved on specific clusters (contain sectors) of a hard drive that is attached to your PC. Once they get deleted either via emptying Recycle Bin, Shift + Delete, DOS command delete or other methods, the file system only marks the spaces where those files occupy as “Deleted” and also telling the system that those spaces are now free to be overwritten.
 
Once your hard drive volume is almost full, new files will directly take any free space. Until then, your files are totally deleted by overwritten. So if there is no new data overwrites the space of the file, the deleted file still stays there.
 
Therefore, once data loss is discovered, the first thing to do is to stop storing and editing data to the hard disk and recover the lost data with the best hard disk recovery software as soon as possible.

How to recover data on the hard disk with Bitwar Data Recovery

Bitwar Data Recovery is the best hard disk recovery software designed to easily recover deleted, formatted or inaccessible files from Windows PC, laptop, hard drive, SSD, memory card, USB drive, SD card, digital camera, multimedia player and other storage devices. From these devices, you can recover audios, videos, pictures, archives, compress files, and documents. It is compatible with FAT 16, FAT 32, NTFS, NTFS 5, ExFAT, HFS+, and HFSX file systems. Here are the steps on how to recover lost data with Bitwar Data Recovery.
 
Download Bitwar Data Recovery and install it by click on this official URL: http://www.bitwar.net/data-recovery-software/ or by clicking the download icon below. Remember not to store any data onto the partition of the hard disk which has just lost data from, even Bitwar Data Recovery installation files.

Step 1: Launch Bitwar Data Recovery software and select the partition which your data lost from and click “Next”. If you want to recover data from an external disk, please connect it to your computer and select it on this step.

Select Device


Step 2: Select “Quick Scan” and click “Next”. If files are not overridden by other data, files can be fully recovered.
 
If you performed a quick format on a partition of hard disk, you can select “Formatted Recovery” to recover your formatted data.

And if you haven’t found the lost data by “Quick Scan” or “Formatted Recovery”, don’t worry, try “deep scan” one more time. The deep scan will search every sector of a hard drive with a detailed scanning algorithm to find all existing files. But the scanning process will spend more time than a quick scan and will not have the original file name in the scanning results.

Select Scan Mode

Step 3: Choose the correct file types and press the “Next” button to start scanning.

Read more? Please refer to:

The Best Hard Disk Recovery Software

Fix You Need to Format Disk in Drive Before You Can Use It

Summary: Error message such as “You need to format disk in Drive before you can use it” is kind of annoying problem when you plug the external disk or USB pen drive with the computer.

https://www.bitwar.net/data-recovery-software/

It disables you to access the files in your drive, however, never hit Format Disk. This article will provide you with massive reasons into why not and best solutions on how to fix external hard drive asking to format error without losing data.

error-message

Reasons Why External Hard Drive Says It Needs to Be Formatted

The external hard drive is a device with portable storage with relatively high capacities, can be plugged into your computer or thru FireWire for wireless connection. It is often used to back up especially large size files. Like any other removable device e.g. USB flash drive, pen drive and SD card, external hard drive when usually forcedly unplugged from the computer without using Safely Remove Option causes the device being corrupted and unreadable or disk management displays file system as RAW.

Other Reasons for You need to format disk in Drive before you can use it Error

  • Virus attack
  • Bad sectors in the external hard drive
  • Abrupt power outages while the external hard drive is working
  • File system not recognized by the target environment e.g. Windows

A simple reminder: Upon unplugging your external hard drive using Safely Remove Option, a warning message will pop up “This device is currently in use. Close any programs or windows that might be using the device and then try again”, do it and once done restart your computer.

Use CHKDSK or Check Disk Utility to check your external hard drive for issues

Take note of the drive letter in the error e.g. “You need to format the disk in drive H: before you can use it, do you want to format it”. Your external hard drive letter is H. Right click on the Start Menu and select Command Prompt or type “cmd” and hit Enter to run it as administrator. In the popup command window, type “chkdsk drive letter:f”, since your drive letter is “H”, then simply type “chkdsk H:f” and hit Enter.

CHKDSK_RAW

The windows will start repairing errors and damaged files. After that, try to plug in your external hard drive, consider restarting your PC. If you encounter the message “the type of the file system is RAW, CHKDSK is not available for RAW drives,” we’ll move on to the promising solution – recover your data.

Recover data with Bitwar Data Recovery software from not formatted external hard drive

Here is the quick guide in using Bitwar Data Recovery:

Step 1. Just download and install the Bitwar Data Recovery by in Windows or for Mac. Then click Launch.

Step 2. Launch the software and select the external hard drive to recover your files and go Next.

External-hard-drive-in-bitwar

Step 3.  Choose the scan mode and select the file(s) you wish to recover. Click Next.

Read more? Please refer to:

6 Methods to Fix You Need to Format Disk in Drive Before You Can Use It

Design a site like this with WordPress.com
Get started