When Xbox One Stuck on Green Screen

Summary: This article will explain in details that what causes Xbox one stuck on green screen of death and how to fix the problem. Or if you want to recover lost games from Xbox, try with Bitwar Free Data Recovery Software now.

There is altogether a different sort of excitement when you get to play your favorite video games with high definition graphics and real-time experience from the comfort of your home. Xbox One is one such video gaming console that gives you an enthralling experience in the world of online gaming.

Xbox one

But, what if the Xbox gets stuck while loading and displays a green screen of death error?

Obviously, at first it will ruin all that excitement and secondly, you may end up losing many games.

If this has ever happened to you, and you were unable to fix the issue then, do not worry! There are a couple of steps which could be of great help during such times. All you need to do is to follow the article in order to fix the issue of Xbox one stuck on green screen.

What causes Xbox one Green Screen of Death

Although there is no confirmed reason for Xbox to get stuck on green screen, we have listed below some of the issues that may cause green screen of death to occur.

  • Xbox communicates with the Microsoft’s server each time it starts to check for any updates, and this may cause Xbox one stuck on green screen.
  • Sometimes Xbox does a security check to see if there are any suspicious files.
  • Sometimes there can be HDD read-write error that corrupts the HDD.
  • Communication errors between the servers which causes the software to get corrupt.

How to Fix Xbox One Stuck on Green Screen of Death

Before you decide to send your Xbox for repair when it gets stuck to the green screen of death, you may want to try any one or all of the below-mentioned solutions to overcome the concern.

Fix Xbox One stuck on green screen by Updating the System

  1. At the onset, go to support.xbox.com and click on the game you wish to play.
  2. Now, click on “System” and select “System Update” tab.
  3. After this, go to “How to use the Offline System Update Diagnostic Tool” and scroll down to download “OSUDT2” in the USB drive, this will let you install the update on Xbox One.

If in case, you failed to install the “OSUDT2”, then select “Restore Factory Defaults” file.

  1. Now, press the Eject + Accessory pairing together, and press the Power key by pressing and hold first two buttons on your Xbox One and wait for repair.
  2. When you see “Applying Update” message on a screen, insert a USB drive containing the OSUDT2 update and apply to install.
  3. If failed to install, download “Restore Factory Default” file in the USB and connected it to the Xbox console to reset the factory settings.
  4. After this, it will ask you, “if you wish to keep the installed games or not”, click on yes.

Following the process, you will get over the Xbox one stuck on green screen error. Now you can continue playing your favorite games. If this doesn’t solve the error then follow the next solution.

Use Bitwar Recovery Software to Recover Lost Games from Xbox One (Best Method)

So, as stated above, after you have fixed the Xbox One stuck on green screen error, you will definitely need a recovery tool with the help of which you can unformat your favorite games on Xbox One. The best program that you can go for is Bitwar Data Recovery Software.

It is free data recovery software that can retrieve any type of data from hard disks, lost partitionsSD cards and much more for Windows or Mac. It is extremely reliable and boasts the highest recovery rate.

Here are the steps to use it:

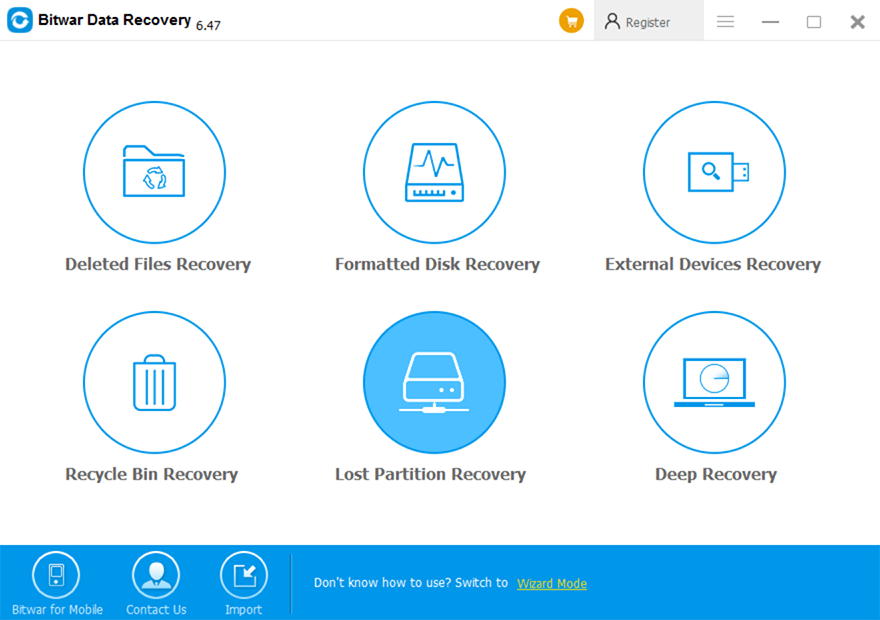
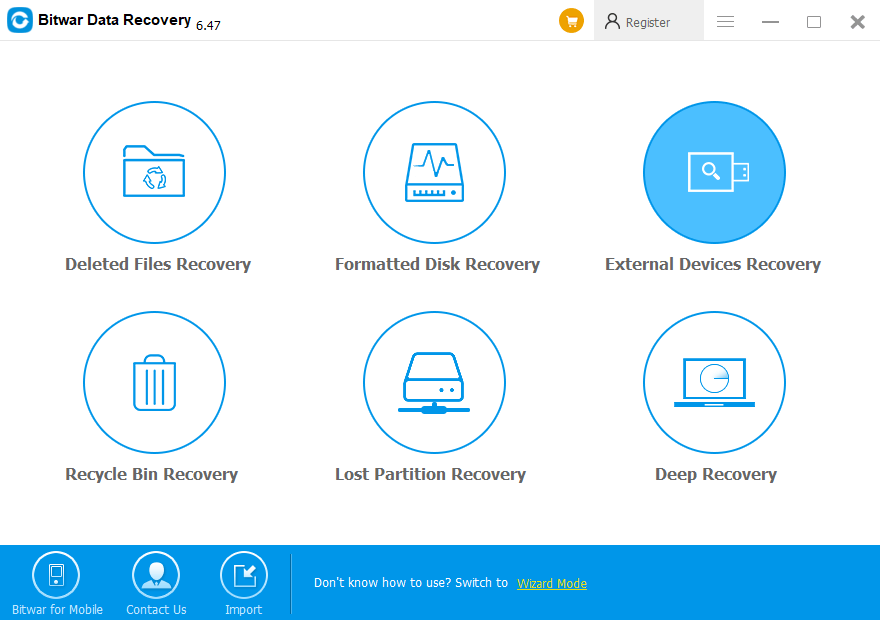
  1. Download and install Bitwar Data Recovery tool on your PC and launch it.
  2. Simply, connect the Xbox One hard disk with the PC.
  3. Now, choose the above drive on the Bitwar Data Recovery program.
  4. The software will now scan all the deleted games.
  5. After the scanning ends, select the games and hit Recover.
Deleted Files Recovery

Please refer here for more about Xbox One data recovery.

Remove Watermark from a photo

Many people love taking photos during daily life or traveling, sometimes they need to erase some unwanted objects, texts, date stamps or watermarks from the pictures. And we found that many users asked similar questions related to watermark removal, and below question is just one of them:

“Hi, I would like to remove watermark from a photo, I don’t know how to use Photoshop and indeed I didn’t purchase that license either,  I tried to use some of the online free watermark removers, but they couldn’t be that useful to get rid of the watermark clearly. So, do you guys have the better photo editor software that can help me? Paid software will be fine, but please don’t be so expensive! Thanks!” —Asked by Tommy Alan

If you are having the same problem, please don’t worry, we are going to introduce the EasePaint Watermark Remover, which is professional and free watermark remover that helps the users remove the watermark, logo, people, unwanted object, date stamp, text, emoji easily and quickly in 3 steps. Besides, we offer free trial for users to test, here we will lead you the steps on how to remove watermark from a photo.

How to remove a watermark from a photo

Step 1. Download the EasePaint Free watermark remover from the official website: https://www.easepaint.com and then start to install.

EasePaint Watermark Remover Free Download

Step 2. After installing the program no matter on your Windows 10, 8, 7, and Vista or XP, please double-click on the EasePaint Watermark Remover icon from the computer desktop to launch it.

Step 3. Now, click on Add Images Button to select the image you need to edit.

Launch EasePaint Watermark Remover

Step 4. Click on Custom Selection, an Eraser icon displays on the main toolbar, you can also choose Square Selection option to erase the watermark, it depends on what kind of shape of the watermark it is. In the meantime, you should also tick on White watermark, please check here.

White Watermark

Step 5. After selecting the area you need, click on Start Erase button to get jobs done. and you will see a message pops-up and allows you to click on Open Path to locate the photo you edited.

Free Watermark Remover

Step 6. Congratulations, we’ve deleted the watermark from this photo.

Remove Watermark

Please refer here for more about watermark remover.

SD Card Not Full but Says Full?

Summary: 

This article provides detailed information about steps to be taken when the SD card not full but says full. Check it out to find out how to fix this error!

A Secure Digital card, commonly known as SD card is a super mini flash memory card that houses a large volume of memory. SD cards are small-sized and can be connected to a number of portable devices such as video cameras, DSLR’s, computers, laptops, mobile phones, and audio players etc.

These cards are available in size ranging from 8GB to 256 GB. Using these cards is very simple, just plug it into the slot provided in your device and you are good to go.

But, sometimes you may see that these cards, as soon as they get connected to the device, prompt a message, “SD card not full but says full”. Do not worry! If you ever face this kind of issue then, this article will be of great help to you as it explains a couple of ways to get over this error.

Possible Reasons Why SD Card Not Full but says Full

You know that the SD card which you are using is empty, and when you attach it to some device, let’s say to your digital camera, it displays a message that SD card is full.

Well, there can be a couple of reasons behind the display of this message, and below we have listed the prime reasons that can cause this error.

In case of the damaged card, there is no way out, but to replace it with a new one, and for other concerns, we have listed solutions below in details.

Proven Ways to Sort the Issue of SD card Not Full but says Full

There are many ways to resolve the issue when even your new SD card full but can’t see files. Here we are going to talk about some of the best ways to help with the concern, just pick the solution which is best suitable for you.

Restore SD Card to Full Capacity with CMD

As we already know the Command Prompt is capable of many things regarding computer administration but in case you don’t know, it is also capable of restoring SD cards as well. Here are the steps that can help:

  1. Open the command prompt as an administrator on your system by clicking on the start button and type “cmd” followed by a right click.
  2. Type the command “diskpart” in the command prompt and hit enter.
  3. After this, type “list disk” command, it will display the list of all disks connected to your computer, and press enter after writing the command.
  4. Now, run the command “select disk #” to select the USB disk you wish to restore. (Replace # to the exact disk number)
  5. Type the command “clean” and hit on enter.
  6. After Showing Diskpart succeeded in cleaning the disk, make a new partition on the USB drive using “create partition primary” command.
  7. Now, in the final step type, the command “format fs=fat32 quick”, which will format the freshly created partition to FAT32 file.

Now, go to “Windows Explorer” and check if the SD card is restored to full capacity. If not follow the next solution!

Recover your SD card with Bitwar Software Recovery Software

Another solution to the error related to SD card says full but nothing on it that is to recover the SD card with one of the best free data recovery software.

This can be really helpful if you know there is some important data in your SD card but you can’t access it due to the certain errors like already mentioned above. It can restore the data easily and then you can fix the device without any headaches.

All you need to do is, just follow the steps in order to get back data using this highly efficient file recovery software.

Step 1: Download Bitwar SD Card Recovery Software from the official website: https://www.r-datarecovery.com. It is completely compatible with both Mac and PC.

Step 2: Connect the SD card to your computer.

Step 3: Now, launch the recovery program. On launching, you will see “External Devices Recovery”, click on it. Select the SD card that you wish to retrieve and then click on the “Next” button.

Please refer here for more about SD card data recovery.

Fix “USB Drive not Showing Full Size” Issue

Summary:

Have you ever meet “USB Drive not showing full size issue but don’t know why and how to fix it? This article will introduce the “USB Drive not showing full size” issue and offer methods to fix it and recover the data.

Why doesn’t USB drive show full capacity in Windows?

Generally speaking, the situations that a pen drive shows less space happens including:
        ●The USB drive is made to a bootable disk. Installing bootable OS (operating system) such as Chrome or Linux. It will change the partition system of your pen drive so some free space will appear
        ●The USB drive is divided into two or more partition.
        ●There is an unallocated space. We all know that unallocated disk space cannot be used if there is no partition created on it. The result is that you can only make use of allocated space. Therefore, we can fix the problem by adding unallocated space to an existing partition.
        ●The disk is physically damaged. If the storage device is physically damaged, the capacity might change. The entire disk size in Disk Management shrinks or increases largely, or the USB drive shows 0 bytes if you check its properties.
        ●Removing the pen drive suddenly while it is working
        ●Interruption before formatting completed or using some third-party software inappropriately
        ●Computer virus

How to fix the “USB drive not showing full size” issue?

This part provides two solutions to fix “USB drive not showing full size” (restore USB drive back up to original capacity).


Tips: All solutions will completely wipe the data on the USB drive, please backup all important files before proceeding. Besides, carefully select the order before formatting or cleaning operations, or you may run into the wrong disk by mistake.

Solution 1: Restore USB flash disk to full capacity with DiskPart

Step 1: Run “Command Prompt” as “Administrator”. You can launch it easily by clicking the “Start” button and select the option “Command Prompt (Admin)”.
 
Step 2: Type the “diskpart” command in the “Command Prompt” windows and hit “Enter”.

usb drive not showing full size

Step 3: Type “list disk” command so that the diskpart lists all disks connected to your computer, and the command should be followed by pressing “Enter”.
 
Step 4: Execute the “select disk #” command to select the USB disk you want to restore capacity.
 
Tips: Be very careful here! “#” is the disk number of your USB drive, you should replace “#” with the correct disk number. Be sure that you select the correct drive, as all the rest actions will be performed on the selected disk. If you select the wrong one, you’ll lose all the data stored on the disk.
 
Step 5: Type “clean” command and press “Enter”.
 
Step 6: Type “create partition primary” command to create a new partition on the USB drive after DiskPart succeeded in cleaning the disk.

usb drive not showing full size

Step 7: Type “format fs=fat32 quick” command to formats the newly created partition to the FAT32 file system.
 
Now you can open “Windows Explorer” to check if the USB drive is restored to full capacity.

How to recover lost data from formatted USB drive?

If the backup is unavailable at all, just trust Bitwar Data Recovery software to bring back lost data.

Steps to recover lost data

Step 1. Select your USB drive in which you lost your important data, then click “Next”.

Step 2. Select the “Formatted Recovery” mode if you formatted the USB drive just a moment ago. If files are not overridden by new data, files can be fully recovered.
 
In addition, if files are not found by Quick Scan, try “Deep Scan“. Deep scan can find all the files with a detailed scanning algorithm, but it will not display the file names and take a longer time.

best data recovery software

Please refer here for more about data recovery.

Best Photo Recovery Tools

Summary:
 
This article introduces the top 5 best photo recovery tools for you. If you lost your photos from your storage devices, such as hard disk, USB flash drive, SD card, memory card, etc. you can choose one of them to recover your photos back.
 
Have you lost your photos or other digital media files? Photo and videos are memories of special events which you can’t redo it. So the loss of it often makes us feel sad. We all know how the data is stored on the storage device. When data files are deleted from the computer, their directories disappeared for the moment, however, their contents weren’t immediately destroyed. Windows simply marks the hard drive space as being available for use by changing one character in the file table so that the file entry won’t be displayed in My Computer or a command line DIR command, etc.
Hence, if your photos have been accidentally deleted or formatted, don’t be panic. The operating system only erases the address table, not the data itself, so there is still a chance to do recuperation with a photo recovery tool.
 
As soon as you’ve become aware of data loss, it’s critical you stop using the drive affected immediately. Whether the drive itself is failing or you’ve simply deleted a file accidentally, this is the golden moment when you may be able to get your data back before it’s gone for good. In that case, you need the best photo recovery tool to recover your important data back at any cost.
 
We know there are more photo recovery tools on the internet can help us to recover deleted or lost photos. So we’ve picked 5 of the best free deleted file recovery software in the business that will make it easier and quick for you to choose a data recovery software.
 
Here are the Top 5 best photo recovery tools that can recover data from HDD or external devices.

1.   Bitwar Data Recovery

We know that to recover some small size pictures, you just need a free photo recovery tool enough. But the fact that Bitwar Data Recovery can do more. It is a fast, reliable, powerful, and free photo recovery tools which can recover deleted files for PC quickly. It is compatible with any devices such as digital camera, hard drives, SD cards, Memory cards, phones, media players and portable drives. Whether you deleted these files, or lost them due to virus, or due to formatting, or virus infection you can still have them back using this software. Moreover, this program lets you preview files that have been recovered. You can use Bitwar Data Recovery to recover your lost files without size limits, quantity limits, and type limits.
 
Bitwar Data Recovery for windows: http://www.bitwar.net/download/?bitwar-windows
Bitwar Data Recovery for Mac: http://www.bitwar.net/download/?bitwar-mac
 
Supported Platforms: Bitwar Data Recovery for windows can be used on Windows 10, 8, 8.1, 7, Vista, XP, and older versions of Windows, Bitwar Data Recovery for Mac can be used on Mac OS X 10.11 and later.
 
Steps to recover lost photo with Bitwar Data Recovery:
 
Step 1. Select the disk where you want to recover lost photo from, then click Next.
Step 2. Select the recovery mode due to how data lost, then click Next. You can choose Quick Scan, Formatted Recovery or Deep Scan. The deep scan can find all the files with a detailed scanning algorithm, but will not display the file names and may take longer time.
Step 3. Choose the exact types of files you want to recover, then click Next to start scan.
Step 4. After scan, filter the file you want then preview it, then choose the data you want and click “Recover” button to restore them back.

Top 5 Best Photo Recovery Tools

Tips:
 1. As soon as your photos is accidentally lost, please do not save any more files to that storage device, otherwise you may overwrite your data.
2. When you recover files back, you’d better save all the recovered files on a different drive or device in case of data recovery failure.

2.   Recuva

The Recuva has the ability to restore files from hard drives, DVD or CDs, memory cards, and external drives. It’s known for getting back lost directory structure as well as renaming two files of the same name while performing the data recovery.
Supported Platforms: Recuva data recovery software for PC can be used on Windows 10, 8, 8.1, 7, Vista, XP, and older versions of Windows.

3.   Stellar Data Recovery

Living up to its name, Stellar Data Recovery performs a stellar job in recovering your data from your Windows PC and Mac. If you are regretting your decision of deleting recent files, Stellar Data Recovery tool is here to help you in an effective way. Stellar also has many other tools for home and business applications but here we’ll be focusing on software for photo, USB, and hard drive recovery.

4.   Pandora Recovery

Pandora Recovery is one of the most reliable and effective best free data recovery software out there. Pandora recovery tool has a lot to offer to its users. However, its file detection system is not that reliable and needs to be improved further.

Please refer here for more about data recovery.

Fix “Windows 10 Stuck on Loading Screen” Issue

Summary:

Windows 10 stuck on the loading screen is a very common issue nowadays, this post introduces several solutions to deal with this issue effectively.

One day you boot your Windows 10 PC and see that Windows 10 Stuck on Loading Screen. Actually, many Windows 10 users have encountered such an issue. 
 
If Windows 10 is stuck on restarting, loading some screen with the spinning dots animation moving endlessly, welcome mode, login screen, starting Windows or not boot, you need to fix it to access and edit your files.
 
Usually, it’s not a big problem and users can simply force the computer to reboot and get Windows 10 start normally. If it cannot be solved, you can get into Safe mode or Advanced Startup mode to fix it. Here, we will share how to access Safe Mode or Advanced Startup Options when the issue appeared.
 
Safe Mode or Advanced Startup Options let you repair your Windows 10 PC by restoring it to previous working condition. In safe mode, it offers you all system tools like the CMD, System Restore, etc. and you can uninstall software or drivers which might have caused the issue. Advanced Startup option offers you System Restore, System Image Recovery, Startup Settings, Startup Repair, and several such recovery or repair options. So when your computer doesn’t boot normally, it is stuck in an endless reboot loop or stuck on some screen. In such a condition, you should focus on getting into Safe Mode or boot to the Advanced Startup Options screen.

Solutions to fix the Windows 10 stuck on loading screen issue

Solution 1: Boot Windows 10 in Safe Mode

Step 1. Press Power button to restart Windows 10 > continuously press the F8 key at Login to bring up Safe Mode;
 
Step 2. If you encountered this issue when you were trying to update Nvidia Drivers, then after entered into the Safe Mode, you can make a rollback of the Nvidia drivers and remove the video card driver in Device Manager. Then try to restart your computer in normal mode.
 
Step 3. Virus or malware may cause “Windows stuck on loading screen” issue and the installed antivirus software conflicts with the current Windows OS. So you can scan and remove virus, and uninstall anti-virus software later;
 
Step 4. Check and fix system drive bad sectors that cause Windows 10 boot stuck or failure error. If bad sectors exist in system partition, the computer may not be able to load or get stuck at the loading screen. Then you can repair bad sectors with the chkdsk command.

Solution 2: Boot to the Advanced Startup Options screen.

When you access the boot menu, press F11 to open the Choose an option screen, from here, press Troubleshoot and then Advanced Options to reach the following screen.

Windows 10 stuck on loading screen

Once you can go here, try any of these options:
 
1. System Restore: Please follow these operations: press “Start” button > select “Control Panel” > search for “Recovery” > click “Open System Restore” > press “Next” > choose the restore point you want to use > select “Next” > choose “Finish”.
2. System Image Recovery: Lets you recover your Windows using a system image file.Similar to “Startup Repair.”
3. Startup Repair: Since you can’t boot Windows 10 normally, you need to use a Windows 10 installation CD or enter the Safe Mode to open command prompt window and type “bootrec.exe /fix” to do a system repair.
4. Command Prompt: Using the CMD you can access the more advanced built-in Windows tools
5. Startup Settings: It lets you change Windows startup options
6. Go back to the previous build.

The best data recovery software

Bitwar Data Recovery software is completely free to download and can recover lost or deleted files, photos, audio, music, emails from any storage device effectively, safely and completely.
 
Download Bitwar data recovery and install it.
Note: please don’t install the software or store any data on the partition that contains lost files.

Please refer here for more about data recovery.

Watermark Remover Software

Reusing your Watermark Document? Look Here for Your Solution!

Everyone always wants to protect their privacy and data when doing their project. To protect them, we will watermark our document. If some of you are asking what is a watermark or what is the purpose of a watermark? Put it straightforwardly, and it is a logo or symbol that is added into your documents such as presentation, paperwork, project, photos, videos, etc. There are many ways to add a watermark to your projects!

Reusing Watermarked Projects?

However, sometimes, we may want to reuse our data or documents for the next projects or papers, and it is time-wasting to create the same thing without a watermark. Sometime, users may have a backup, clean file without a watermark on, while others will look for a watermark remover to help them to remove the watermark from the projects. There are many online watermark remover on the Internet, but it is unwise and dangerous if your projects are essential.

how

Watermark Remover Software

We recommend the best and useful watermark remover software, Easepaint Watermark Remover to help you remove your watermark easily and quickly! The software provides a lot of valuable features for you, including batch removing, remove unwanted text or image from the photo and videos. You can download and install the watermark remover software for free!

EasePaint Watermark Remover Free Download

Simple and Beautiful Interface

The software has been designed to have a comfortable and simple interface for users. The tools and settings are very simple and easy for users to set and operate. Therefore, you don’t need to have professional editing skills to remove watermark when using the software!

Launch EasePaint Watermark Remover

Batch Removing Watermark

One of the software features, you can batch remove your photos or videos watermark by just adding or drag them into the software. Then click “Batch Erase” to start the watermark removal.

Click Batch Erase

Removing Unwanted Text or Photo

Besides removing the watermark, the software can help the user to remove unwanted photos or texts from your projects by a few simple steps!

Step 1. Add in the photos.
Step 2. Highlight the unwanted photo or text.
Step 3. Click “Start Erase.”

remove people from photos

Please refer here for more about watermark remover.

Best USB Drivers for Mac

Summary:

In this guide, we’ll help you choose the best USB Drivers for Mac OS. Besides, you’ll learn how to retrieve data from a USB Driver.
 
When it comes to storing data, personal information, and essential documents, you can never save it in a safe place. The USB drives are not only useful for storing data but are used to transport files from one location to another. So whether you want a place to keep your photo collections, the latest years’; worth of schoolwork or all the material for a particular client, the USB drives are an excellent choice for you.
 
USB drives are almost entirely universal devices, so you don’t have to worry about which ones will or won’t work with your computer unless you have the MacBook Pro, which has no USB-A slots at all! In that case, you’ll need a USB-C dock or adapter connect to the MacBook Pro to use most flash drives. Beyond that, almost everyone can benefit from having a USB drive on hand.

How to recover data from a formatted USB drive?

We know after you formatted the USB drive, the data will be erased. But the data remains in the USB drive. The storage disk space that format is available for other new data to write in. So we need to recover the data on the USB drive with Bitwar Data Recovery software before other data occupy the disk space. It is better to unformat recovery as soon as possible to prevent data override.
 
Bitwar Data Recovery for Mac can be used to recover multiple types of files from different locations, including the Mac platform and even external devices. No matter data lost due to deletion, partition errors, formatting, virus attacks, or system failures, you can still have them back using this software with a few clicks.

Steps to recover data from a formatted USB drive on Mac

Download and Install Bitwar Data Recovery for Mac.

Download and install Bitwar Data Recovery for Mac. It is compatible with OS X 10.11 and later.

Step 1: Select the formatted USB drive

Connect your formatted USB drive to the Mac and launch the Bitwar Data Recovery program. Then select the USB drive where your data lost and then click “Next.”

Select Device

Step 2: Select the Scan Mode

Select “Formatted Recovery” and click “Next.”
 
● Quick Scan: Recover files from accidental deletion, such as Command + Delete, emptied the Trash or removed by other software, etc. The files can be retrieved entirely in the condition of the files or directory structures haven’t other data are overwritten.
● Formatted Recovery: Recover formatted files after performed a quick format on a partition or hard drive.
● Deep scan: If the previous scan could not work to find lost files, try Deep Scan this time. Deep scan will search every sector of the hard drive to find all existing data. But the scanning process will spend more time than a quick scan and will not have the original file name in the scanning results.

Select Scan Mode

Step 3: Select the file type

Select the types of files you want to restore. You can recover all kinds in Bitwar data recovery for mac.

If you want to recover words, select the “Document” type and click “Next,” if you’re going to recover all data from the formatted USB drive, you should choose “Select All Types” and then click “Next.”

Please refer here for more about data recovery.

Fix “Android Process System isn’t Responding”

Summary:

The “Android process system isn’t responding is a standard error that occurs in almost every kind of Android device. Don’t worry. We have listed four different solutions for it right here.
 
The android device sometimes will run into the “android process system isn’t responding” error especially after user installing a new app from a source, or after a bad update of the Android version. It froze your Android phone, leaving an unresponsive screen, which happened on almost all Android models.

Why Does the “Process System Isn’t Responding” Error Occur?

Regardless of what Android device you’re using and how old it is, the error is known to pop up all phone that running any Android OS version. Most users have reported they encountered this error after getting a new Android OS update or installing apps from outside Google Play Store. Of course, other reasons can cause this error, and they are:
 
          ● A Software conflict.
          ● Insufficient storage space or memory-internal as well as external SD card.
          ● Corrupted SD card.
          ● Malicious apps installed from unknown sources.
          ● Unreliable custom ROM (rooted devices only).
          ● Missing system files.
 
In a word, there are many reasons why the error may appear. And, if your Android phone contains some critical data that has been lost, you’d better recover them before fixing it in case of any accidents.

How to Fix Android Process System Isn’t Responding

Solution 1: Restart your device

Sometimes, a simple restart is all you need to fix the processing system isn’t responding issue on Android. If this fix for the processing system isn’t answering the question doesn’t work, go on to try out the Solution 2 below.

Solution 2: Update Installed Android Apps

Step 1. Open Google Play Store, swipe from left to right and tap on My apps & games.
 
Step 2. You should see a list of all the apps that need to be updated. Update every app to the latest version or tap on the Update All to schedule them all for updating.

Solution 3: Update Installed Android Apps

Go to Settings, tap on System update, and hit Check for Updates. Wait for the query to be completed. If there are any OS updates, install them, and wait for your device to reboot.

Solution 4: Removing the SD card

Your SD card might be the reason why the “process system isn’t responding” error appears. If your SD card has malfunctioned or it merely has some bad sectors that prevent the system from accessing the required information, it can trigger this error. A quick way to check if your SD card is causing this issue is to remove it physically. Once you have it removed, restart your device.

If the issue doesn’t appear, it’s clear that you have a malfunctioning SD card. Before you throw it out, wipe it completely, and re-insert it in your device. If it still appears, there is a problem with your phone.

Solution 5: Clear device cache

Hard resetting your Android smartphone usually clears the processing system is not responding error. However, this step does end up causing you to lose all of your app data, which can later be restored using Google Play Store. If the above Solutions is useless, please follow the steps below to hard reset your handset.
 
         1. Press and hold the Power button to turn off your Android smartphone
         2. Simultaneously hold the Power button and the Volume Up button on your device.
         3. This will launch the stock recovery mode on Android give you the ability to wipe device cache.
         4. Using the Volume buttons for navigation, move down to select Wipe device cache and wait for the device to reset.
         5. Once the device cache has been wiped clean, restart your Android device.
 
As stated earlier, you will now lose all of your data on your phone. So before you doing that, make sure you have all of your relevant data backed up or recovered.

How to Recover Data from Android Phone?

Fortunately, Bitwar Android Data Recovery can help you effectively recover lost data from Android with the processing system isn’t responding error. It has friendly user experience and wizard operation. You can improve the data from android devices by only three steps, including contacts, messages, call logs, photos, videos, voices, etc.

Preparing the Environment

1. Install Bitwar Android Data Recovery

You can recover data with Bitwar Android Data Recovery software to your computer. It reduces the possibility of data being overwritten.
Download Bitwar Android Data Recovery on your windows and install it: https://www.bitwar.net/android-data-recovery-software/.

Download

2. Connect your Rooted Android Device to your Computer.

As the software can only access the rooted Android device, you need to installed the root application to your PC to root your Android phone.
For information on how to root, refer to How to Root your phone. Then connect your rooted Android device to your computer.  

Root Success

Steps to Recover Lost Data with Free Android Data Recovery

Step 1: Connect the Android Phone to the computer

When the program is installed, and the rooted Android Phone is connected, launch Bitwar Android data recovery. Then wait for the program to identify your Android device.

Please refer here for more about Android data recovery.

Best iPhone Recovery Software

Summary:

This article guides you to choose an excellent iPhone data recovery software to retrieve your precious data.

There are many so-called iPhone Recovery programs on the market. Various programs are hard to select and choose one of them. Once you make the wrong choice, your data will be risky. 

The best iPhone data recovery software should contain the following features.

1. Safe and reliable.

2. The high success rate of recovery.

3. Intuitive interface and no requirement for technical skills.

4. Compatibility, working for all iOS versions, at least the version working on your iPhone.

5. File types for recovery, able to recover contacts, messages, notes, photos, video, etc.

6. allows you to preview data before recovery.

7. Strong technical support team.

Now, you know how to choose a reliable iPhone recovery software. According to the items above, I tried more than 10 iPhone recovery software, and I think Bitwar iPhone Data Recovery meets the above conditions.

Bitwar iPhone Data Recovery is a professional data recovery software for iOS devices. It has a user-friendly experience and wizard operation. You can recover the data by only three steps, and easily find the lost data even if you are not familiar with computer operations. It can retrieve the lost data of iPhone/iPad/iPod, including photos, videos, contacts, messages, notes, call logs, bookmarks, reminders, and calendar, etc. Moreover, this program lets you preview files before you recover them.

How to recover data from the Best iPhone Recovery Software

When you lose data from iPhone, you should stop using the iPhone, disconnect the network, close unnecessary applications, and then restore the data right away. 

Bitwar iPhone Data Recovery supports to recover from an iOS device.

Download and Install Bitwar iPhone Data Recovery

iTunes can help Bitwar iPhone Data Recovery to find the deleted data with more details. First, install Bitwar iPhone Data Recovery on your Windows or Mac.

Download Bitwar iPhone Data Recoveryhttps://www.bitwar.net/ios-data-recovery-software/

Best iPhone Recovery Software for Mac and Windows

Tip: Bitwar iPhone Data Recovery can directly detect whether iTunes is installed on the computer, and download the installation components directly without installation. If there is an installation or a computer that has backed up Apple data using iTunes, it can directly select the feature to scan from the backup.

The first time to access the iPhone needs to install the necessary fruit and devices, with a time of 3-5 minutes, please be patient.

Best iPhone Recovery Software for Mac and Windows

Steps to recover lost data from iPhone:

Recover from iOS Device

Step1: Launch the program and Connect iOS Device to the Computer
 
Launch the Bitwar iPhone data recovery program on your computer and connect your iPhone to the computer via a USB cable. Select the default recovery mode “Recover from iOS Device” and wait for the program to identify the connected iPhone.

Best iPhone Recovery Software for Mac and Windows

Please look here for more about iPhone data recovery.

Design a site like this with WordPress.com
Get started