Windows Was Unable To Complete The Format

If USB flash drive cannot be formatted and was informed with a prompt “Window was unable to complete the format” error. These errors indicate that Windows can’t format flash drive and the USB flash drive are inaccessible. Just follow and find solutions here to get your problems solved right now.

USB drives can be connected to a computer easily via USB drive to backup or transfer data. Sometimes, when you want to format it, you may be unable to format your flash drive. For example, it popped up an error saying “Windows was unable to complete the format”. Why is this happening?

can't format usb drive

The Main Cause that Windows can’t Format USB Drive

This error may happen as a result of the following reasons:

1. Virus infection

If you plug USB flash drives into a public computer, you’ll take the risk of damaging the files and even the drive will stop working due to Virus attacks.

2. USB flash device has bad sectors.

As we all know, storage devices consist of sectors. The bad sector means the sector is damaged and can’t be read or written. Thus bad sectors can disrupt the formatting operation as well as file recovery. There are quite a few causes of bad sectors, like bad quality, excessive defragmentation, unplug USB flash drive directly while it is working, etc.

3. USB flash drive suffers physical damage

Physical damage is another reason that makes storage device inaccessible. The computer won’t be able to format the device if it can’t use the device.

4. USB Flash Disk is write-protected

Windows can’t format a drive when it is in the write-protected state. As formatting is a kind of writing operation, so you need to remove the write-protection before formatting it.

How to fix windows can’t format the flash drive?

If you are having a similar problem for unable to format or can’t complete the format process on your hard drive partition, external hard drive, USB flash drive, SD card or other devices, don’t worry. Here in the below, we’ll show you two effective methods to fix the device format.

Note:  if the flash drive or devices gets badly physical damage, these solutions won’t help you.

Important: You should make sure that important data and files of the drive to be formatted have been backed up, as files will be erased once the drive is formatted. If your flash drive is inaccessible before you back up the data, then you need to perform file recovery first before formatting. 

Fix Windows can’t format the flash drive

Solution 1: Format via Disk Management

Disk Management is provided by Windows, and it helps to manage partitions and disks for computers. Disk Management is able to create a new volume, extend or shrink partition, change drive letter, delete or format partition, etc. the error flash drives can be repaired with the Disk Management tool. Following the steps below, you can make a USB formatting procedure performed successfully.

Step 1: Open Disk Management. Right-click on My Computer and select item “Manage”, and then click Disk Management on the left side. In the center section, you can see local hard drive and partitions and the USB drive, which can be recognized by capacity.

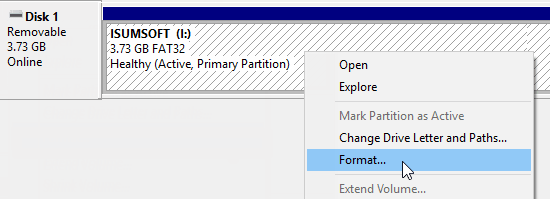
Step 2: Right-click the flash drive and select “Format” option and select the file system format to perform a quick format.

can't format usb drive

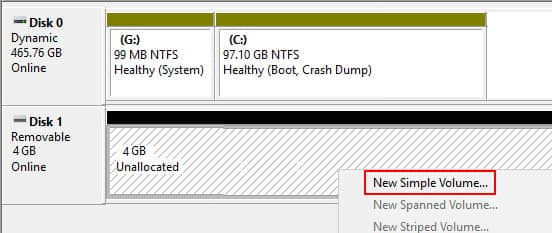
Step 3: Right-click on the USB flash drive and select “New Simple Volume” item. You’ll get the New Simple Volume Wizard which guides you recreate new partition for the flash drive. Operations are following the onscreen instructions, setting options, and click the “Next” button. When the process is done, you’ll find the USB drive has been formatted and is properly recognized by the system.

can't format flash drive

Recover the data as soon as possible

Since the USB flash drive cannot be accessed or formatted, you need to perform file recovery as soon as possible. Otherwise, it will be overwritten with new data.
 
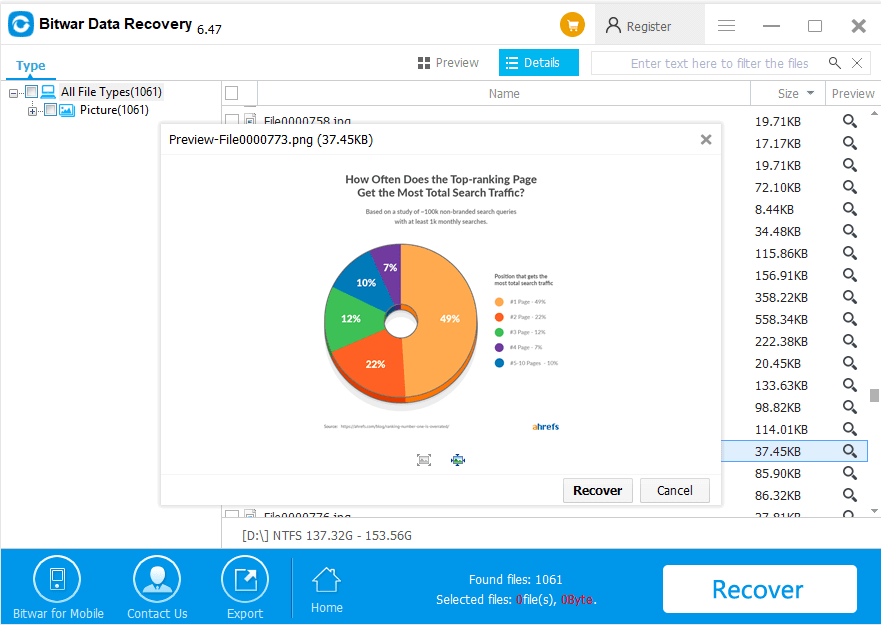
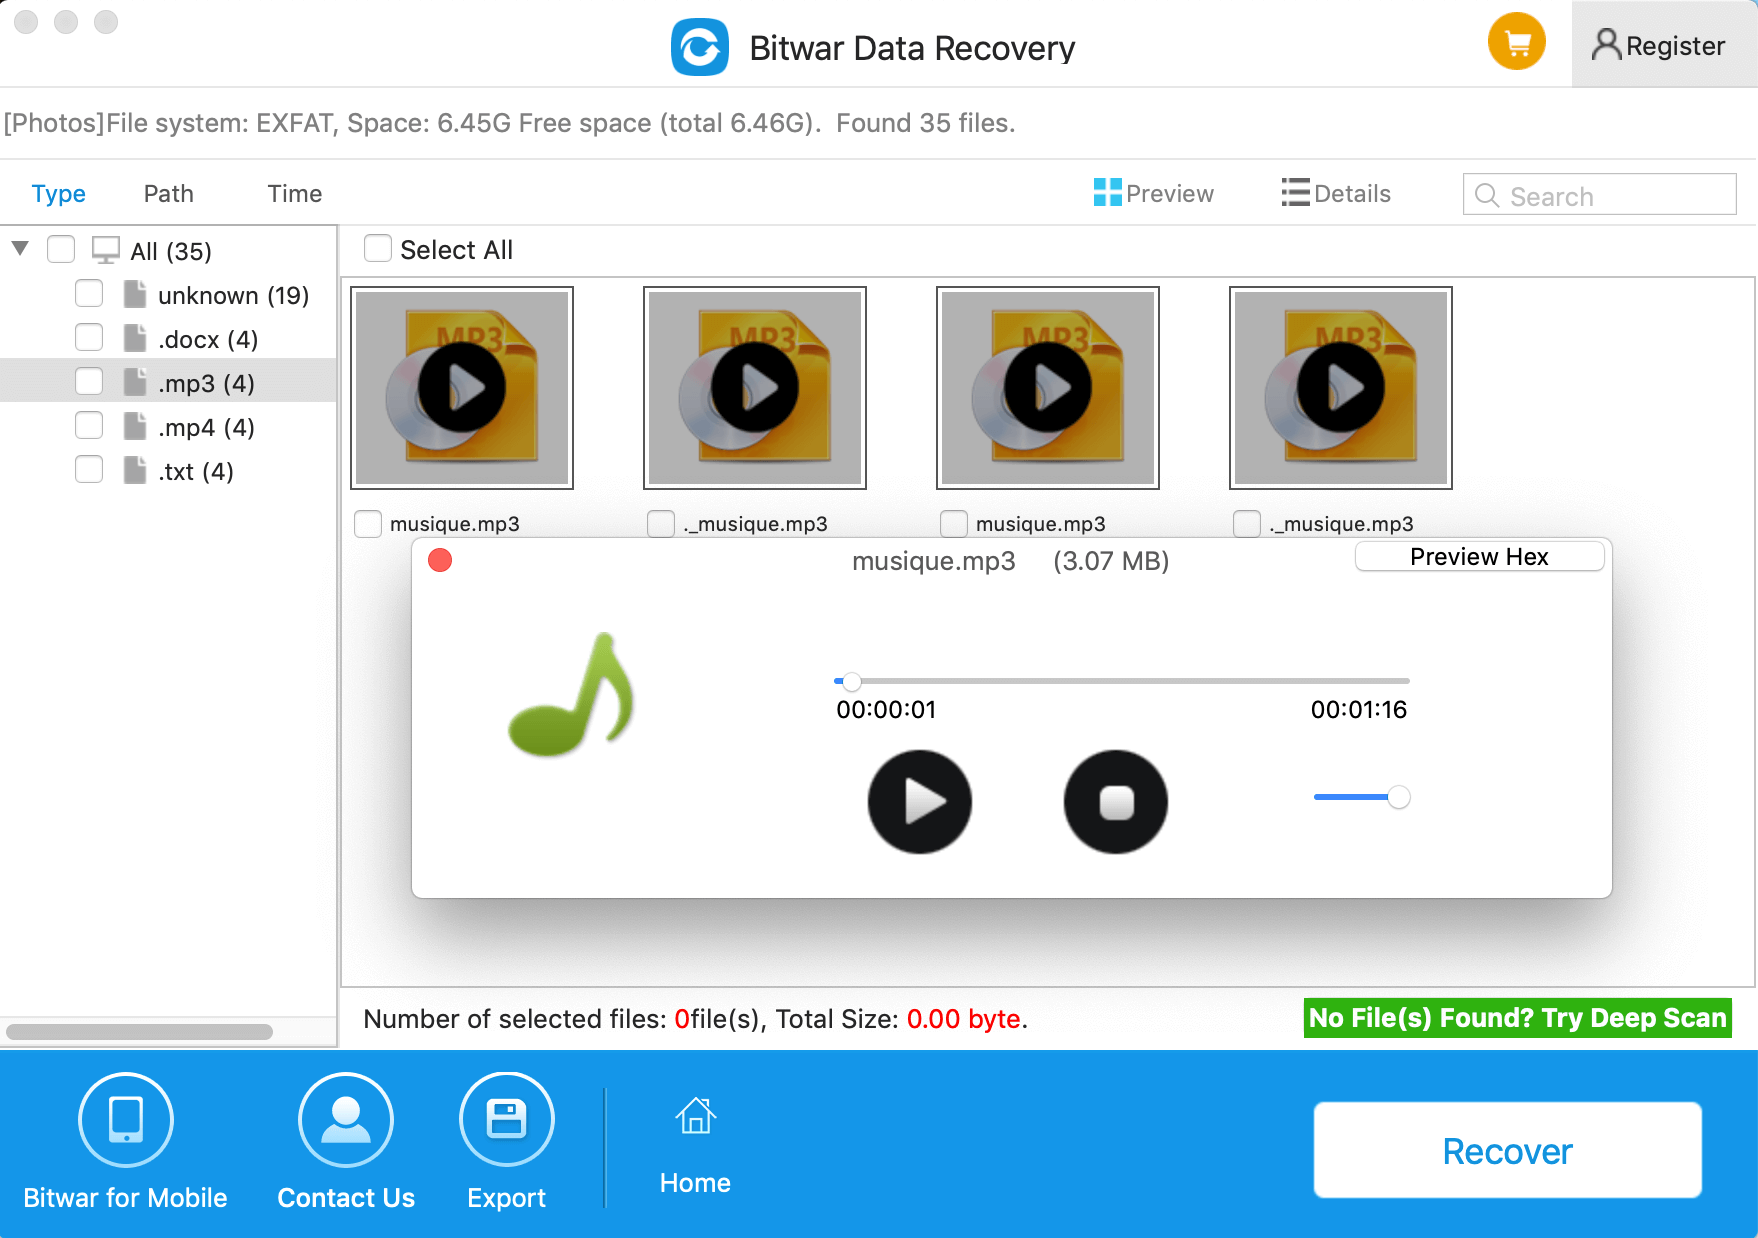
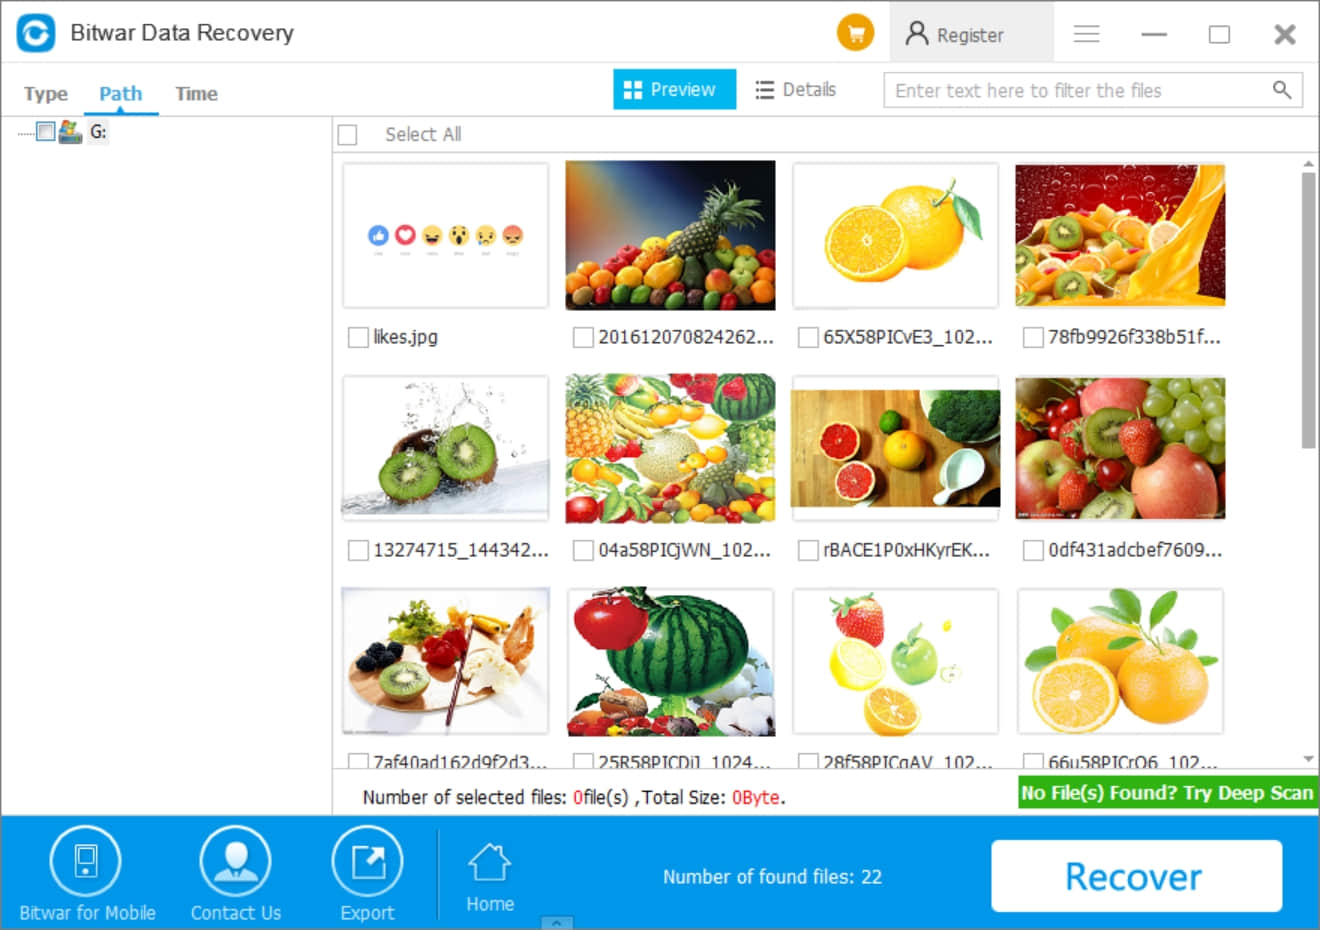
To recover lost data from the USB drive cannot be accessed or formatted, you should try Bitwar Data Recovery software. It is completely free to download which works well for all file types, including audios, videos, pictures, archives, emails, and documents, etc. It can help you easily recover deleted data from the emptied Recycle Bin, digital cameras, memory cards, CF cards, SD cards, USB flash drives, and external hard drives, etc. the program can be applied in various data loss situations. For example, system crash, hard drive formatting, virus attack, partition loss, and other unknown reasons in Windows.
 
Now you can free download Bitwar Data Recovery here and install it on your computer. Then make sure that your USB drive is connected to this computer very well.

Why not have a try?

Please refer here for more about data recovery.

Convert PDF to PPT in Simple Way

Bitwar PDF Converter Software provides many types of PDF conversion tools such as PDF to ImagePDF to WordPDF to Excel, and many more. Presentation file which is PPT is one of the most commonly used file formats. So follow the tutorial below as it will show users how to convert PDF to PPT by using the PDF tool in the software!

Steps to Convert PDF to PPT

Step 1. Please Install or Download the latest version of the software from the official website here for free: https://www.pdfcword.com/

Step 2Launch the software. Choose PDF to PPT from the left side of the main interface and click Add PDF File to add files.

Step 3. Click Convert and wait patiently for the conversion to complete.

Step 4. When the conversion is complete, choose Open File to preview the new PPT file in the directory folder.

Let’s try it now!

Please refer here for more about PDF to PPT Converter.

iPhone Data Recovery Software Windows

There are many so called iPhone Recovery software on the market. It makes people who really need it difficult to make a choice. Once you make the wrong choice, your data will be risky. Then how can we choose a good iPhone data recovery program?

The best iPhone data recovery software should contain the following features:

    1. Safe and reliable.

    2. High success rate of recovery.

    3. Intuitive interface and no requirement for technical skills.

    4. Compatibility, working for all iOS versions, at least the version working on your iPhone.

    5. File types for recovery, able to recover contacts, messages, notes, photos, video, etc.

    6. allows you to preview data before recover.

    7. Strong technical support team. 

Now, you know how to choose an effective iPhone recovery software. According to the items above, I tried more than 10 iPhone recovery software, and I think Bitwar iPhone Data Recovery meets the above conditions. 

Bitwar iPhone Data Recovery is a professional data recovery software for iOS device. It has friendly user experience and wizard operation, you can recover the data by only three steps, and easily find the lost data even if you are not familiar with computer operations. It can recover the lost data of iPhone/iPad/iPod, including photos, videos, contacts, messages, notes, call logs, bookmarks, reminders and calendar, etc. Moreover, this program lets you preview files before you recover them.

How to recover data from the Best iPhone Recovery Software

When you found your data lost from iPhone, you should stop using the iPhone, disconnect the network, close unnecessary applications, and then restore the data right away. Bitwar iPhone data recovery offers you 2 recovery modes: Recover from an iOS device and Recover from an iTunes Backup. Both of these recovery options can help you recover lost data from the iPhone. Therefore, you can choose one of them to recover according to whether or not there is an iTunes backup on your computer or whether the data on the phone is overwritten.

Download and Install Bitwar iPhone Data Recovery

The iTunes can help Bitwar iPhone Data Recovery to find the deleted data with more details. So first, Install iTunes and Bitwar iPhone Data Recovery two software on your Windows or Mac by clicking the icon below.

     Download Bitwar iPhone Data Recovery:https://www.bitwar.net/ios-data-recovery-software/

     Download iTunes:https://www.apple.com/itunes/download/

Steps to recover lost data from iPhone:

Tip before recovery

Bitwar iPhone Data Recovery can directly detect whether iTunes is installed on the computer, and download the installation components directly without installation. If there is an installation or a computer that has backed up Apple data using iTunes, it can directly select the feature to scan from the backup.

The first time to access the iPhone needs to install the necessary fruit and devices, with a time of 3-5 minutes, please be patient.

1、Recover from iOS Device

Step1: Launch the program and Connect iOS Device to the Computer

Launch the Bitwar iPhone data recovery program on your computer and connect your iPhone to the computer via a USB cable. Select the default recovery mode “Recover from iOS Device” and wait for the program identify the connected iPhone.

Step2: Select the type of files you want

Step3: Preview and recover data

Let’s try it now!

Please refer here for more about iPhone data recovery.

Recover Lost Data from Corrupted SD Card

With the full name of “Secure Digital Card,” SD Card is a type of memory card that is typically used in media devices. Such as Android mobile phones, digital cameras, and other portable devices. But there will be a variety of problems, such as SD card data loss, SD card cannot be read, or SD card corrupted case and so on. This article will show you some practical methods to fix the SD Card can not work problems.

1. Use the CMD command or Windows System Tool

Fix 1: Change the Drive Letter

In some cases, If your SD card can’t be read by a computer when connecting via a card reader, it could be that the computer is unable to assign drive letters (like C, D, E) to the reader.

1. Connect your SD card via a card reader to your computer. Right-click on “My Computer/This PC” and choose “Manage.”

2. Click “Disk Management” on the left. Right-click on your SD card and choose “Change Drive Letter and Paths.”

3. Then select the right drive letter from the drop-down list. Click “OK” and then see if the SD card can be recognized now.

Fix 2: Reinstall the Drivers

There are times when the drivers run your SD card that gets corrupted and your PC is not able to detect the storage media. You can reinstall drivers by following these simple steps:

1. Right-click “My Computer/ This PC”. Click “Manage.”

2. Click “Device Manager” on the left side.

3. Double-click “Disk Drives” in the list. Right-click on the name of your pen drive.

4. Click “Uninstall”. Click “OK”.

5. Disconnect your storage media and restart your PC.

6. Connect your pen drive again. Your PC will detect it and install it.

Fix 3: Recover a corrupted SD card by using the CHKDSK command

By using the Command tool, the Windows computer can execute the Chkdsk command and fix the corrupted SD card.

1. Click on the “Start” button, select the “Computer” option. Search for your SD card under “Devices with Removable Storage” and note the assigned drive letter.

2. Click on the “Start” button, in the search box, type “cmd”.

4. Right-click “cmd.exe” and then select the “Run as administrator” option.

3. In the newly-opened command window, type the command: chkdsk [sd card drive letter]: /f /r /x and press enter.

Fix 4: Format Corrupted SD Card

Formatting an SD card will erase all contents stored in the card. If you have backed up and recovered the data on the Corrupted SD Card, you can try to repair the corrupted card by formatting it so that you can continue to use it. here are the ways to format an SD card in windows system environment:

1. Open”My Computer/This PC” and right-click on your SD card.

2. Choose Format in the drop-down menu. When there is a pop-up window, click “Restore Device Defaults” > “Start.”

3. If you want the computer to be deep scan the card, uncheck the Quick Format option.       

2.  Recover the corrupt SD card with Bitwar recovery software.

The most important thing you should know is to stop using the corrupted SD card until you can recover all the data you still need. Once the card is overwritten, the data will be deleted automatically.

Firstly, try to fix the accessible matter with the methods mentioned above. Once you can enter in the SD card,  data recovery software scans the SD card and retrieves all your precious files, photos, videos, audios, etc.

Free download and then install Bitwar Data Recovery Software. For the SD card, you will have to insert it into the slot that provided in your computer or by using an external card reader.

P3.png

Easily Solved!

Please refer here for more about corrupted SD card recovery.

How to Use Chromecast for Mac?

Chromecast setup on Mac is easy and it changes everything in regards to digital media streaming. Using this Chromecast for Mac will be possible to view content on a big screen in the comfort of your home or even at the office.

What is Chromecast?

Chromecast is a line of digital media players developed by Google which enables users with a mobile device or personal computer to initiate and control the playback of Internet-streamed audio-visual content on a high-definition television or home audio system through mobile and web apps that support the Google Cast technology.

What are the requirements for setting Chromecast?

To broadcast audio or video wirelessly from your Mac to the big screen (TV), you will need a Google Chromecast, a Television or projector, Chrome web browser (free for Mac), a WiFi network, and of course a Mac computer.

Connecting your Chromecast

Connect your Google Chromecast to the HDMI socket on Mac. Insert your USB Micro-B connector into your Google Chromecast dongle, and connect the USB Type-A connector into a USB port on the Mac.

Google Chromecast setup

To successfully set up the Google Chromecast, you need to connect to a WiFi network on your Mac. This needs to be the same WiFi network you want your Chromecast to connect to and use. Remember that Chromecast requires a constant network connection to function correctly and does not work correctly offline.
 
Open your Chrome web browser and go to http://www.chromecast.com/setup, download the Chromecast DMG by clicking the blue download button and install the Chromecast app for Mac. Make sure to agree to the license terms (after reading them) and click the ACCEPT button.
 
After clicking the accept button, the app will search for available Chromecast devices on your network.
 
If your Mac is unable to find your Chromecast, check your Wifi or switch your Mac’s WiFi network to 2.4 GHz mode instead of 5GHZ or mixed.
 
Next, configure the Chromecast by clicking the blue Set Up button. Click the appropriate setup button next to your detected Chromecast and select your country from the dropdown list.
 
Make sure the displayed code on your Chromecast app is the same as the code showing on your Mac screen. Ensure you double-check the laws before clicking the “that’s my code button,” you wouldn’t want to pair to another Chromecast in your house accidentally!
 
Once you are connected, a confirmation message will display on your Mac and television, “Congratulations! You are ready to cast”.

Apps to stream from device to Chromecast?

You can stream BBC iPlayer, Google Play Music, HBO GO, Hulu Plus, Netflix, Pandora, Plex, PostTV, RealPlayer Cloud, Red Bull TV, Songza, Vevo, Viki, YouTube, and many others. You can also drag and drop most media files into Google Chrome to play them in the browser. Once they are playing in the browser, you can use the “Cast” icon to stream the files to your Mac or TV.

Performance tips for Chromecast on Mac

When streaming videos from Google Chrome on Mac to your Google Chromecast, you will notice that the quality varies greatly. Poor quality is usually the result of poor network conditions or “full tab” and “full screen” streaming. The best way to stream media is by using a direct connection. This occurs on sites that have “native” support for Chromecast. When immediate streaming media, your computer only instructs the Chromecast to stream the media but does not flow all of the media to the Chromecast. This results in a far superior quality video than streaming browser tabs and fullscreen on your Mac.

How to stream lost files from your Mac to Chromecast

You can get your lost videos or images back using Bitwar Data Recovery for Mac and stream them from Mac to Chromecast.
 
Bitwar Data Recovery for Mac is a user-friendly data recovery tool for Mac users that will help to recover lost or deleted files, including photos, videos, music, and vital business documents. With the help of this recovery tool, you can restore your lost files effectively, safely, and completely.

How to restore lost files with Bitwar Data Recovery for Mac

Download and install Bitwar Data Recovery for Mac on this Official website for your Mac. It is compatible with OS X 10.11 and later. Then follow the guides to recover data lost due to Notepad++ Mac.

Tips: For the latest mac OS 10.13 (High Sierra) system requirements, Mac users are not allowed access to system disk from apps. If you want to recover data from the system disk, please disable the system feature “System Integrity Protection (SIP),” see the guide on How to Disable System Integrity Protection (SIP) in macOS High Sierra (macOS 10.13)?

Bitwar Data Recovery for Mac

Why not have a try?

Please refer here for more about Mac Chromecast Recovery.

Difference Between Word and PDF

In the digital age of this generation, the computer has become an essential gadget for everyone in our daily life. When it comes to a computer document, the two most popular document formats are PDF (Portable Document Format) and Word/DOC (Document). These document formats are mostly used in all type of field, such as school work, office document, hospitality document, business, contracts, etc.

Even though they are both used for creating and sending documents but there a lot of difference between these two formats, for a brief introduction, the Word format was created by Microsoft and PDF was made by the Adobe software. So each of the company has produced their software to create and edit the document for each of the file formats which Microsoft for Word and Acrobat Dc for PDF.

So what is the critical difference between Word and PDF files? Which is more useful or beneficial to the user? Please continue with the article as it will explain the difference between Word and PDF below!

Word Document

DOC files are created in 1983, as the developer is Microsoft. It was a word processing document created which is also a filename extension for the document. Users can use it as documentation in the form of text, tables, graphics, images, pages, etc.

DOC-1.png

PDF – Portable Document Format

While for the PDF format, it is created in 1993 approximately ten years after DOC file. It is more like an open file document for view and document exchange between users. The main reason for PDF format is to make document sharing between computers or operating system more comfortable and faster. PDF files aren’t able to modify and edit without PDF editor software.

Acrobat-PDF-1.png

Difference Between Word and PDF

Word file is very compatible with most of the operating system available on the Internet. Users can open Word file on all type of policy and able to edit the content of the file easily. This format allows users to produce a text document fast and mobilise by utilising the writing toolset provided in Mircosoft Office. Text and material are editable upon other users and varieties type of document presentation through DOC format.

While for PDF document is more about sharing, printing, storing, integration, content security, etc. When it comes to finalising a document or sending to other users, most users will choose PDF format instead of Word because PDF file is uneditable and modifiable. It will keep all the content, images, graphs in the same layout a format even it is opened by different operating system or reader.

PDF also allows users to encrypt PDF password or lock PDF to ensure the content of the file is safe and protected. Unlike Word file, the content is public and editable by all who own the data. This make PDF produces a higher quality document format for users to print and share with a different supporting system.

But on the other hand, Word document will be better if the receiver user needs to reuse some of the images or graph and edit the content before finalising the document. Therefore, both file format has its purpose and uses. It mostly depends on one’s need when coming to preparing a document file.

Document-File.png

PDF and Word are Compatible

After this, most people may think that is it the document file in the computer system is divided into two: The Microsoft and Acrobat. Like Apple and Android in the mobile phone industry. PDF and Word are not precisely like Apple and Android because both these file formats can be converted to one another.

In Microsoft Word, the user can save their Word file in PDF format by going to Menu > Save as > PDF Format. While for Acrobat user, the user can export the PDF file to DOC/ Word format by choosing Export PDF > Word Document. Even though sometimes a user may want to edit a PDF file, the user can use a PDF converter software to convert PDF to Word easily. Vice versa, the user can convert Word to PDF by using the same PDF converter software.

At the End of The Day…

Please refer here for more about PDF Converter.

Fix The Parameter is Incorrect Error

Did you get “The parameter is incorrect” error message and cannot access your external hard drive, USB drive or SD memory card? How can you fix the error without data losing? Here are some useful instructions that can help you to fix the issue and recover your missing data.

Sometimes, when we tried to access files stored on the hard drive, the warning message “I:\ is not accessible, the parameter is incorrect” appeared. Why?
 
The parameter incorrect is probably the most common issue that is associated with the hard drive or external storage drives. You can go on reading the article to find out the helpful solutions when you meet such a problem.

Causes of “the parameter is incorrect” error

There are some reasons for this kind of error:

● USB Port problem; the USB is a link between a computer and an external hard drive, and once it is not functional, the hard drive might be damaged.

● Improper removal of the hard drive; unplugging the hard drive from the computer directly damages the hard drive hence the cause of the error above.

● Bad sectors on the external hard drive; one bad sector on an external hard drive might make the entire partition inaccessible. These bad sectors might damage the whole drive.

● File system corruption In computer, a file system is used to control how data is stored and retrieved. Once file system goes wrong, you may fail to access drive and receive some errors like “the parameter is incorrect,” “Data error (cyclic redundancy check),” “Windows is unable to complete the format,” etc.

In computing, a file system is used to control how data is stored and retrieved. Once file system goes wrong, you may fail to access drive and receive some errors like “the parameter is incorrect,” “Data error (cyclic redundancy check),” “Windows was unable to complete the format,” etc.

Recover data first from the drive

Well, when encountering the error “drive is inaccessible, the parameter is incorrect,” experienced users will firstly think of recovering data and files from this drive, and then fix this error. How to effectively retrieve data from the drive that parameter is incorrect?
 
You can consider using recommended software like Bitwar data recovery, and it is designed to recover missing data caused by various reasons. Moreover, this program allows you to preview files before you recover them.
 
Download Bitwar data recovery from its official website or by clicking the below download button and install it.

recover lost files

Easily Solve!

Please refer here for more about how to fix The Parameter is Incorrect.

Fix “File System Verify or Repair Failed” on Mac

File System Verify Or Repair Failed error happens mostly on external hard drives because of the damaged hard drive. Such failure may also lead to data loss. How to fix this error? How to restore the data when it causes data loss? This article will tell you the answers.

First Aid in Disk Utility is a Mac built-in tool to detect and repair hard disk. Whenever we find any problem on a drive, the first solution is to run First Aid. But First Aid can only fix some minor errors. It can’t repair some severe problems due to serious file system corruption, such as the “file system verify or repair failed” issue.

When meeting the “file system, verify or repair failed” error on the external hard drive, don’t be mad. Calm down and recover data first.

How to recover data from the hard disk

Bitwar Data Recovery for Mac is a professional Mac data recovery software that can restore lost data from the drive with only a few simple clicks. It can be used in various data loss situations, such as system crash, disk formatting, virus attack, file deletion, and other unknown reasons on mac. Anyway, whenever you, unfortunately, face data loss issues, you can turn to Bitwar Data Recovery for help.

Download and install Bitwar Data Recovery for Mac by clicking the icon below, and then launch it on your Mac OS X. The software is compatible with OS X 10.11 and later.
 
Tips: For the latest macOS 10.13 (High Sierra) system requirements, Mac users are not allowed in the access to system disk from apps. If you want to recover data from the system disk, please disable the system feature “System Integrity Protection (SIP),” follow the guide on How to Disable System Integrity Protection (SIP) in macOS High Sierra (macOS 10.13)

Step 1: Select the disk

Step 2: Select the Scan Mode 

Step3: Select the file type

Step 4: Preview, recover and save files

Result

How to fix the “file system verify or repair failed” error?

Solution 1: Fix “file system verify or repair failed” error via FSCK command

If Disk Utility is unable to repair a hard disk, then the FSCK command line should be your next choice, which is a tool for checking the consistency of a file system.
 
        1: Restart our Mac computer and hold down “Command+S.”
        2: Some white text will scroll by quickly. When it stops, type in “/bin/fsck –fy”, then press “Enter”.
        3: Type in “/bin/fsck_hfs -fy /dev/drive letter (for example disk 2)”. FSCK will check the file system and attempt to repair any damage that it finds on a hard drive.
        4: After checking and repairing the file system, type “reboot” into the command prompt and press “Enter” to reboot mac.

Solution 2: Fix “file system verify or repair failed” by reformatting

After external hard drive data recovery completed, we can reformat the drive so that it can be usable again.
 
        1. Launch Disk Utility.
        2. Select the external hard drive on the left part of the window.
        3. Click “Erase” on the top of the window.
        4. Complete related information (name, format, scheme), then click “Erase” to reformat the drive.
 
By following the solution, as mentioned earlier, you can quickly resolve the issue.

Why not have a try?

Please refer here for more about Mac data recovery.

Simple Steps to Batch Convert Word Docs to PDF

Compatibility of the PDF format is widely used in the Digital Era where the most word Document will be saved in PDF file before shared to other users to receive. We can always save the word file as PDF when we are using Microsoft Word. What if we have to convert or save all the Word files to PDF, then it will be very time consuming for all of us to convert each file one by one.

Batch File

Image by Birgit Böllinger from Pixabay

Therefore, Adobe Acrobat software provides the Word to PDF batch converter but not many people are using the converter because of the subscription price is a little high. Don’t worry we will share you the other free alternative PDF Converter Software to batch convert Word Docs to PDF.

Just refer to the article below and it will show you the steps to batch convert word document to PDF by using Adobe Acrobat Software and the alternative PDF converter software!

Simple Steps to Batch Convert Word Docs to PDF – Adobe Acrobat

Acrobat-Reader.png

Image by Clker-Free-Vector-Images from Pixabay

Before we start with the tutorial, make sure you owned Adobe Acrobat software because the software is only available for users who had bought the license.

1) First, open the Adobe Acrobat software, go to the right-side toolbar and choose to Create PDF.
2) Then, select Multiple Files and Create Multiple PDF Files. Continue on by clicking Next.
3) You can start to browse your Word Files for conversion and click OK when you are finished adding.
4) Choose the output directory folder for the converted files and lastly choose OK again to start the batch converting.

If you don’t have Adobe Acrobat, you can just jump to the next tutorial to batch convert Word Docs to PDF by using the alternative PDF converter software.

Free Alternative PDF Converter Software

Deli PDF Converter Software is one of the best free PDF converter software on the Internet. It is a compatible and user-friendly software which it supports Windows 7, 8, 10, Vista and XP. Most importantly, you can convert PDF files to other document formats such as Word, JPG, PNG, BMP, TIFF, GIF, HTML, FLASH, RTF, TXT, CBZ, etc.

It is a very useful and convenient PDF editor software for users as well because it provides PDF tools such as splitting PDF, rotate PDF, lock/unlocks PDF, merging PDF, compressing PDF, format conversion, and also batch convert!

Please refer here on ‘How to Install Deli PDF Converter Software for Free‘ before we begin on how to batch convert Word Docs to PDF using the free alternative PDF converter software.

Homepage
Convert-to-PDF.png

Step 1. Launch the Software after Installation.

Step 2. Go to Convert to PDF on the Left Side of the Main Interface.

Step 3. Add in All the Word Files that You Want to Convert into the Software.

Step 4. Choose Custom Path to Set Your Own Output Directory Folder or the Default Path. (It is your Choice)

Step 5. Finally, click Convert to start the Batch Conversion.

Start-Batch-Convert.png

Conclusion

Please refer here for more about Word to PDF Converter.

Fix No Bootable Device

If your Windows pops out message No Bootable Device error, there are some problems with your system. But do not worry about that, this article will show you how to fix no bootable device error.

What happened when your computer says No Bootable Device?

Many users have come across an error that says No bootable device when they have attempted to start their computer. It is an annoying issue. Usually, when your computer pops this message often means the computer operating system is not available to find the bootable hard disk, so it cannot start to boot. If the error can’t be solved properly, it may not only stop you from booting up PC but also cause data loss. The reason for your computer shows “No bootable device” can be incorrect boot order, faulty MBR, hard drive or partition not detected, or more. But don’t worry! Here are several fixes you should try:

How to fix no bootable device issue?

Method 1. Check or reset the boot order on your PC

An incorrect boot order can lead your computer to boot from an unbootable hard drive or device, and therefore you get a No bootable device error. So you should make sure your hard drive is the first of the boot order. To check your boot order:
 
1.  Enter the BIOS. (You need to restart computer and press F2 or whatever key that computer prompts to enter BIOS, for example, you may need to press “Del” or F10 key to enter BIOS setup.)

No Bootable Device


2. Check the option labeled “Primary Hard Drive”. Then move your Hard Drive to the top of the boot order list. (If it is “none”, then the computer does not detect the connected hard drive.)

No Bootable Device


3.  Press “Save” and restart your computer. 

Method 2. Check all hardware

Shut off the computer and unplug power cable so that you can remove anything connected to the computer such as hard drive, USB drives, mouse, etc. and put back all hardware to see whether the problem can be solved. Many times, a loose connection with a hardware device can cause an error in the discussion. But, if all these devices are plugged well and still get the error, you need to keep reading the rest solutions.

Method 3. System Repair

Step 1. Insert Windows installation disc or bootable USB disk that contains installation files to the USB port of the computer and then restart. In this part, we use Window 7 installation DVD as an example.
 
Step 2. Change boot order inside BIOS to have the DVD boot first.

No Bootable Device

 
Step 3. After the disc loads, you need to select the language, time zone, and Keyboard or input method and click “Next”. Then you can see the following screen where you should click “Repair your computer” on the bottom-left corner.

No Bootable Device


Step 4. Select one installation from listed choices after the computer finished scanning itself; just choose the most appropriate one from the list and continue. Sometimes a problem might be detected at the initial process and the system may also prompt whether to repair the problem automatically. You can let the system to repair or just select No.
 
Step 5. Try “Startup Repair” first. When you get the “System Recovery Options” interface, you can see a list of choices that can help you repair a damaged Windows 7. In general, the first option “Startup Repair” is able to fix many different startup issues automatically. If this option can’t troubleshoot the “no bootable device” issue on your computer, you’ll have to Command Prompt option to solve the problem manually.

No Bootable Device

Step 6. Enter command line “bootrec.exe /FixMbr” and press Enter in Command Prompt window. If it is executed successfully, you’ll be greeted with “The operation completed successfully”. That means MBR (Master Boot Record) has been repaired.

         bootrec /fixmbr
         bootrec /fixboot
         bootrec /scanos
         bootrec /rebuildbcd

Exit Command Prompt and restart your computer. If this method works for you, you will be able to get through the error now.

How to recover lost data caused by fixing “No Bootable Device”?

If the problem is still unresolved, or if you lose important files while solving the problem, it is a very unhappy experience. When the computer fails to boot, you will try best to fix such as repair errors, restore or reinstall OS, format hard drive, etc. It can range in scope from a few corrupted files to everything on the computer, which can be catastrophic. How to rescue lost data caused by system issue, deletion, formatting or other errors?
 
Bitwar Data Recovery is a free and efficient tool to rely on and use in such data loss situations to completely and safely recover data. Only 3 simple steps will help you restore all lost data.

Steps to recover lost data with Bitwar Data Recovery

Simply download and install Bitwar Data Recovery and follow the below steps to recover data.

4771031057?profile=RESIZE_710x

Easily solved!

Please refer here for more about No Bootable Device Issue.

Design a site like this with WordPress.com
Get started