Recover Data From Not Recognized USB

The most anxious situation is that the USB drive unrecognized by Windows causes data inaccessible. This article will show you how to solve such the USB Flash drive not recognized error and introduce the best data recovery software to recover data in inaccessible drives.

There is a risk of data loss when the Windows fails to recognize a USB device. Fortunately, you can always use a USB data recovery software such as Bitwar Data Recovery to restore data from your USB flash drive. Once you’ve safely backed up data, there are several things you can do to fix the “USB Flash Drive Not Recognized” issue on Windows.

Recover data from USB Flash Drive with Bitwar Data Recovery

Bitwar Data Recovery is a fast, reliable and safe data recovery software with powerful functions.

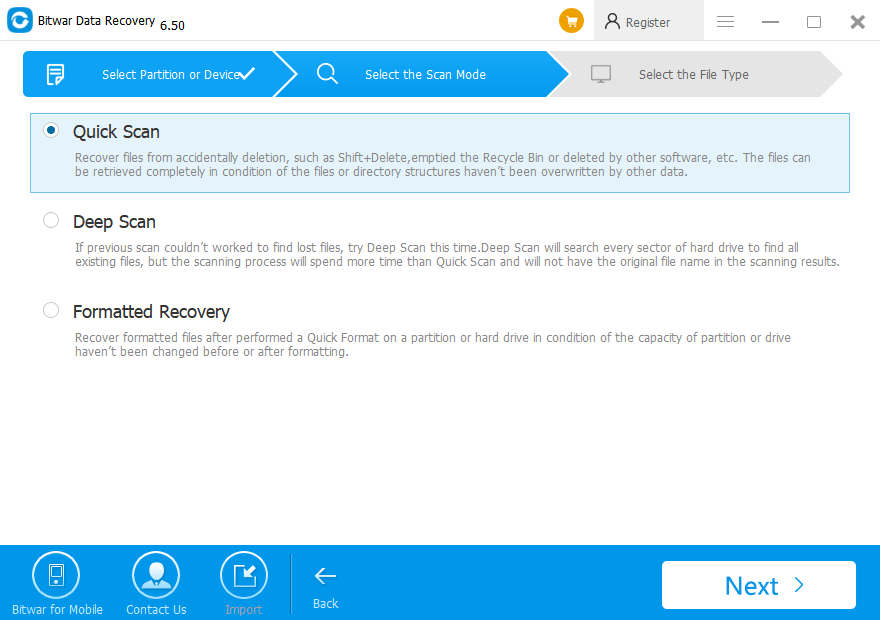
It can restore lost data caused by accidentally deleting, formatting, virus attacking, system crashing or other unknown reasons under Windows 10/8/7/XP, etc. You can restore all lost data with four simple steps. If you can’t find lost data by Quick Scan, please try the Deep Scan again. 

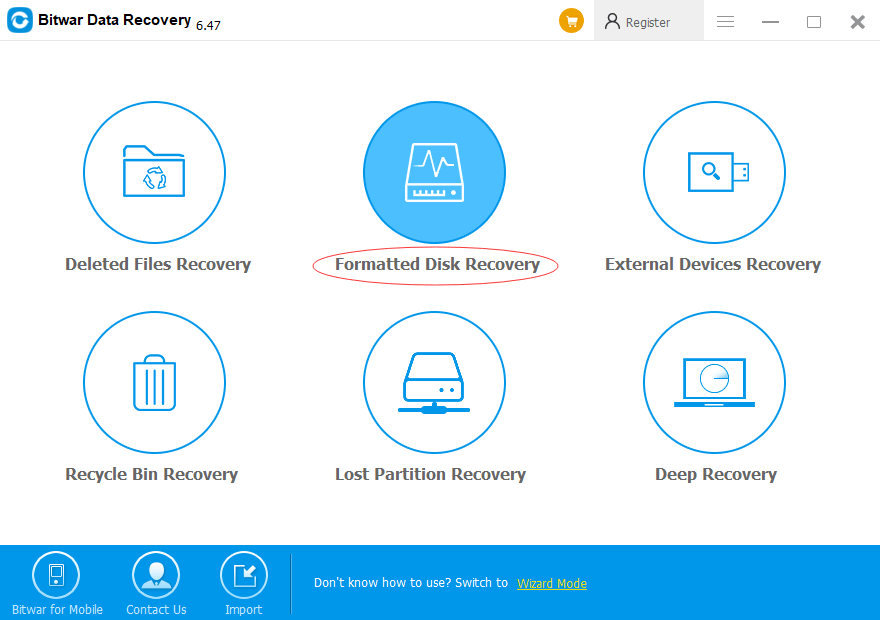
Steps to recover data from USB flash drive

Install Bitwar Data Recovery on your PC and follow tutorials below to recover data from USB flash drive.

Setp 1. Launch the Bitwar Data Recovery and choose “External Device Recovery” on the Standard Mode. If it can not be recognized by Windows, you should choose “Lost partition recovery” to scan the flash drive first.

Step 2. Choose the connected USB flash drive and then click “Next”.

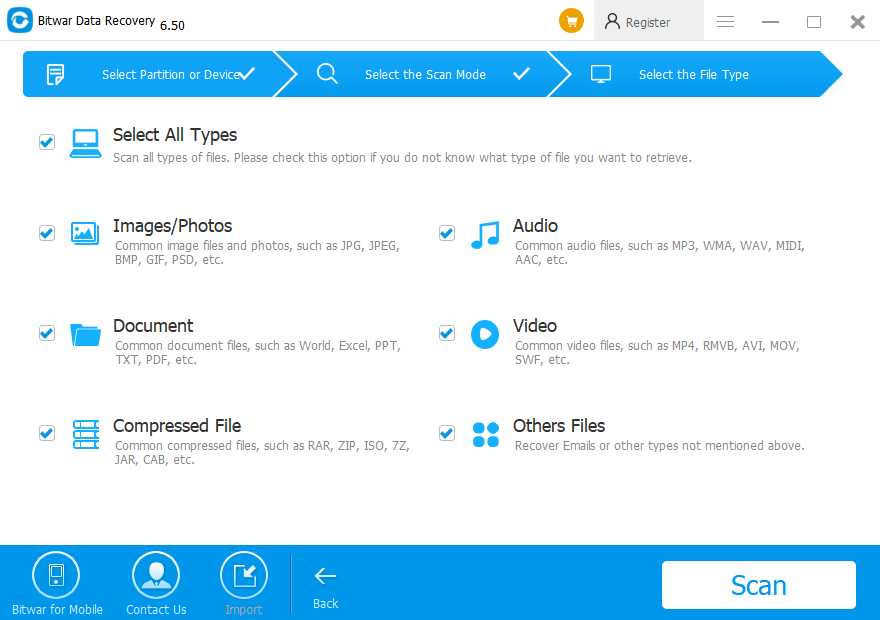
Step 3. Choose the file types you want and then click Scan.

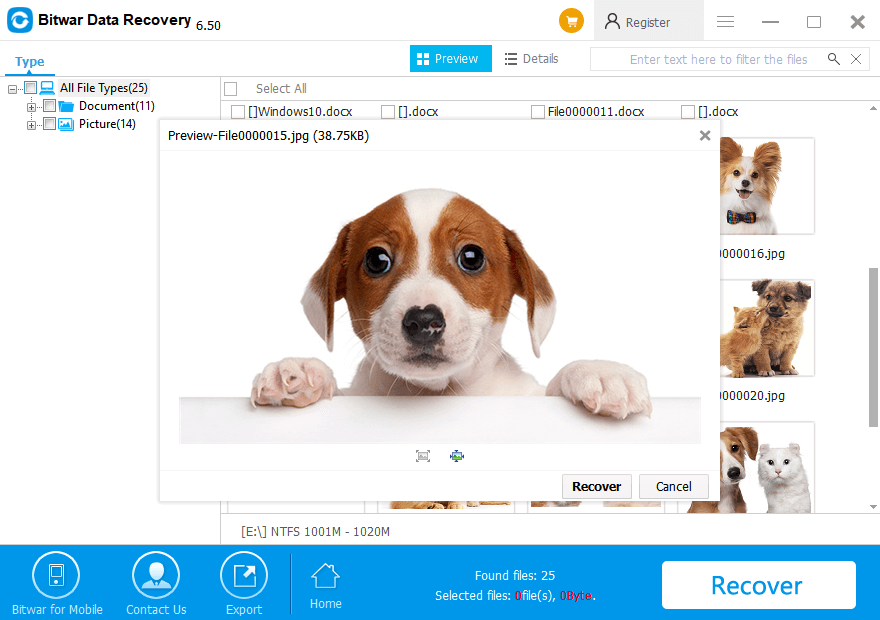
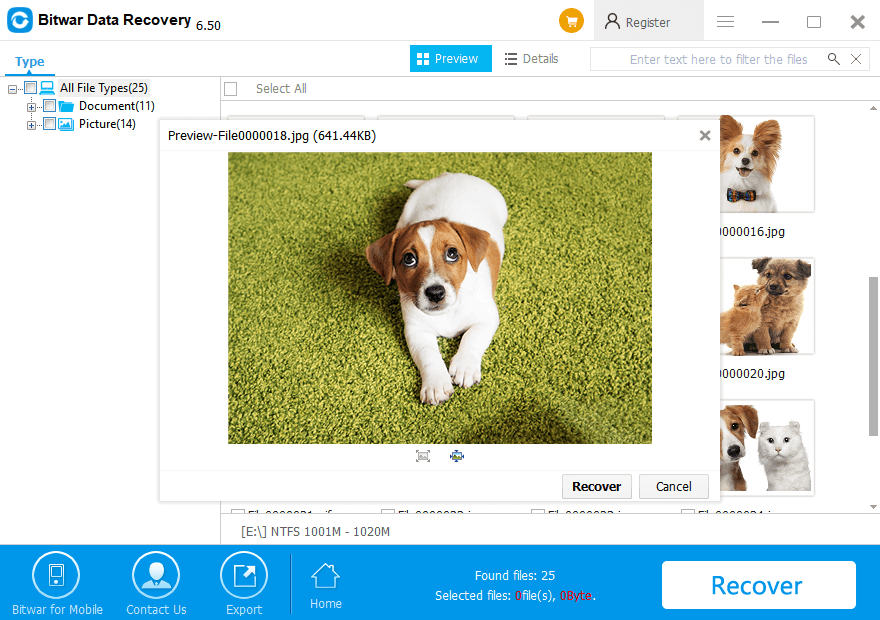
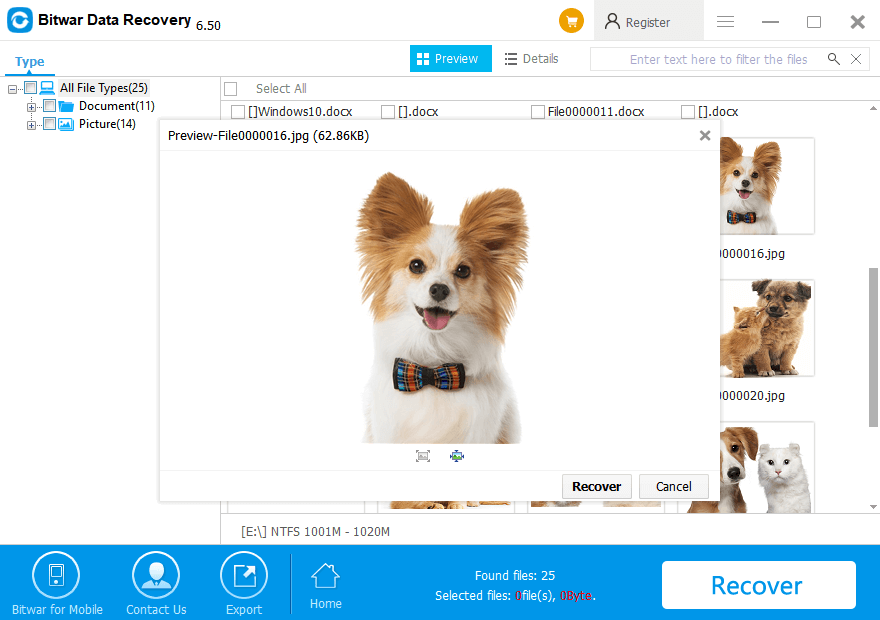
Step 4. Double click the file to preview, choose the files you want and then click “Recover” to save them to a partition of the computer or other external devices.

Solutions to fix “USB flash drive not recognized” error

Solution 1: Check your USB ports

If your USB ports are not functioning properly, Windows cannot detect your USB flash drive.

Navigate to Start >> Control Panel >> Hardware and Sound >> Device Manager >>Universal Serial Bus>> Click on Uninstall >> Click on Scan for Hardware Changes

If Windows still doesn’t recognize your device after these steps, your USB ports are faulty.

Solution 2: Try the USB flash drive on another PC

If you are not sure whether it is the problem of the USB flash drive or the computer port, you can try to connect it to another device.

Find a new PC >> Plug the SD card with the card reader to check

Solution 3: Update your device drivers

If your device drivers are outdated, Windows may display a USB drive not detected the error. To update your device drivers,

  • Press WIN+X and then choose Device Manager
  • Find the Universal Serial Bus controllers
  • Right-click on the USB device’s driver
  • Update Driver Software, click Ok
  • Plug the USB flash drive again with the computer

Solution 4. Disable the device and then enable again

  • Press WIN+X and then choose Device Manager
  • Expand Disk Drives or Memory Technology Devices
  • Right-click on the USB device
  • Disable Device, right-click on the USB device
  • Enable Device, plug the USB device again with the computer

Solution 5. Assign a new drive letter for the SD card

  • Press WIN+X and then choose Disk Management
  • Right-click on the USB device
  • Change drive letter and paths
  • Assign the following letter
  • Choose a new drive letter and click OK 

Solution 6. Load BIOS default

This situation is common in public places like caf&eacute, net-bar, school computer room, and office. The USB interface is disabled because of the safety of the computer.

  • Turn off the PC/Laptop
  • press F1, DEL, F2 (Depends on the motherboard manufacturer)
  • Load setup defaults
  • Save and exit
  • Reboot the computer
  • Plug again the SD card to check

Solution 7. Format the USB flash drive

If your USB device is not damaged physically and you can’t solve with the above solutions. You should recover data from the USB device before and then format the USB flash drive.

Convert the USB flash drive to NTFS:

1. Open This PC/Computer > Find the RAW disk;

2. Right-click it by choosing Format > Select the file system – NTFS and rename it;

3. Click Start > OK.

Easy To Fix!

Please refer here for more about inaccessible USB data recovery.

Recover Unsaved Word Document

Have you lost a word document because the computer suddenly restarts or shuts down? This page tells you how to restore the lost word document.

There are unavoidable circumstances that lead to the loss of word documents, such as interruptions, viruses, software bugs and so on. It means that data loss is unavoidable.

Recover Unsaved Word Document


Is it possible to recover data from an unsaved word document?

There’s nothing we can do about data loss, but is it possible to recover data back from an unsaved word document?
 
The answer is YES! Word has an auto-save feature, but there are times when your documents don’t show up in the recovery pane when you open Word. We can still find the file and restore it.

Ways to restore data from unsaved word document

Solution 1: Recover from the AutoRecovery

Word includes an AutoRecovery option which is turned on by default. When you are editing a Word document, the Word application will create backup copies or auto-save files for you at regular intervals.
 
If the application or your computer stops working when you are editing your file, you can try to open the document again. Word will show you the Document Recovery pane and a list of available files it saved for you. Choose the latest available file to recover your document from it.

Recover Unsaved Word Document

But if you can’t open the file or you don’t see any recoverable file when you open it, you can recover your document manually. You can try to recover it from the unsaved file of your document with the extension of .asd or .wbk:
 
1) Press the Windows logo key + E at the same time to open File Explorer >> click This PC >>Click the search box of File Explorer. 

Then type “.asd” in the search box. The computer will search all the files with “.asd” in their names>> right-click the .asd file of your unsaved document  >> click Open with >> Open the file with Word.
 
You will see the content that Word has saved for you. You can use it to retrieve your document. But if it doesn’t work, follow the above steps to recover from a .wbk file.
 
2) Type “.wbk” in the search box of File Explorer.

Solution 2: Recover from previous versions

Windows can save the previous versions of your files or folders. These previous versions come from the backups or the system restore points where you have created. You can recover your files in a folder by restoring the folder to a previous version before your document corrupted or disappeared.
 
1) Right-click the folder you want to recover and select Restore previous versions.
2) Select a previous version from the list. Then click the Restore button.

Recover Unsaved Word Document

3) After the restore, a window will pop up showing you the location of your folder.
4) Open the folder and you can see that the document in this folder has been restored to a previous version. Open it and see how many contents have been recovered.

Solution 3: Recover from Temporary Files

Your deleted Word documents may be found in your computer’s temporary files folder.
 
Open Windows Search, and then type “*.tmp” to search for *.tmp files. Or, check the following folder: C: Documents and Settings*USERNAME*Local SettingsTemp. Before searching for this folder, open Windows Explorer or My Computer, press F10 and make sure to check the option which enables you to see the hidden files and folders. Notice that once you do this, the files will not be named the same as the original documents. 
 
You can find those temporary Word documents which usually start with ~. If you find your temporary Word file, the best way is to open it by using Notepad.

Recover Unsaved Word Document

Solution 4: Recover with Data Recovery Tool

If you still cannot find the document you are looking for, here is the most effective way to restore your document. You need to do this with the help of third-party software, i.e. Bitwar Data Recovery.

Steps to recover unsaved word document with Bitwar Data Recovery:

Download and install Bitwar Data Recovery on your Windows. Please do not install it on the system partition where you lost your data before.

Let’s Have A Try!

Please refer here for more about Word data recovery.

Convert PNG to JPG With PDF Converter

The tutorial below will show users how to convert PNG to JPG with Bitwar PDF Converter or Paint.

Everyone knows that PNG and JPG are the most common used image formats on the internet. Besides, both image formats have a different purpose and use since some prefer PNG and others will choose JPG.

Related TutorialHow To Convert Word To Image on Computer

Actually, both image formats have some difference, but the most important difference is PNG image is good for compression, but JPG is not. Therefore, it is always necessary to convert PNG to JPG or vice versa when editing images.

So the article will teach users how to convert the image format by using Paint orPDF Converter on Windows!

How to Convert PNG to JPG with Paint

Suppose that users had the Paint application on Windows system, users can convert the image format easily by following the steps below:

Step 1: Start Paint from the computer. Then click on File and Open to open the PNG image on the computer.

Step 2: Choose Save As option from the File menu again and select JPEG picture.

Step 3: Choose the file location and name. Finish conversion by clicking Save.

How to Convert PNG to JPG with PDF Converter

Just in case users don’t have the Paint on the computer, there is PDF Converter for users to use, but users need to convert PNG to PDF first.

Step 1: Open Bitwar PDF Converter and choose Image to PDF tool from the Convert to PDF menu.

Step 2: Click Add Image to insert the PNG file and tap on Convert.

Step 3: Go to PDF to Image from the Convert from PDF menu and add the newly converted PDF file.

Step4: Select the Output Image Format as JPG and click Convert.

Get To Know It!

Please refer here for more about PDF Converter.

Recover Files From Emptied Recycle Bin

Although deleted files in Recycle Bin are inaccessible, they are still recoverable. Bitwar Data Recovery can restore deleted files from the Recycle Bin after emptying.

How to Recover Deleted Files from Recycle Bin in Windows

We know that if you delete files by moving them to the Recycle Bin, you can immediately retrieve them by right-clicking “Restore.” By doing this, the deleted files will back to its original folder without any data losing. Here are some exact steps about how to restore deleted files from Recycle Bin in Windows, you can follow them if necessary.

1. Double-click the icon of Recycle Bin on the Desktop.

2. Select the files or folders you need to restore.

3. Right-click on the deleted files and choose “Restore.”

4. The Recycle Bin will send the deleted files back to their original locations.

Is it possible to recover deleted files from recycle bin after empty?

We all know that Recycle Bin is a folder for the temporary storage of deleted files in Windows. Normally the files you delete from your desktop or hard drive partitions could still be found in the recycle bin. While if you want to get back the deleted files from Recycle Bin but find that it was emptied, can you still retrieve them? The answer is YES.

On Windows, deleted files will not disappear immediately after deleting, they will be saved on the hard drive as Raw data. Only when the raw data are overwritten or erased from the file system, the deleted files will disappear forever. It indicates that you still have a chance of recovering deleted files from the recycle bin.

Therefore, you need to recover the deleted files in time.

How to recover deleted files from Recycle Bin after emptying?

Bitwar Data Recovery is needed to recover the deleted files from the emptied Recycle Bin. It is the perfect choice for you to restore your precious data.

Steps to recover deleted files from Recycle Bin after being emptied

Download and install Bitwar Data Recovery on your PC, and then launch it.

Note: Do not install the program or save any data to the system partition in which the data stored before.

Step 1: Launch Bitwar Data Recovery program, you can see 6 different recovery modes on the page. Each of them focuses on restoring different data loss scenarios. Please select “Recycle bin Recovery” if you want to restore deleted files after emptying the Recycle Bin.

Step 2: Select the type of files you want and then click “Scan” to start scanning each partition of Recycle Bin. It can scan and recover all types of files. If you have no idea about which file type you want, you can choose “Select All Types”.

Step 3: After completing the scan, you can filter the file by file name, type, path, and time in the tree list on the left. Then double-click them one by one to preview the file. The Bitwar Data Recovery supports to preview as many as 300 different file types, including common photos, Word, Excel, PDF, CAD, RAR, PSD, etc. When you find the deleted files, select and click the “Recover” button to restore it. You should not save these restored files in the original partition where the files are deleted to avoid data overwriting.

Note: You can also export all scan results to a specific location so that previous results can be loaded without a rescan.

Recovery Is Easy!

Please refer here for more about Recycle Bin data recovery.

Recover Data from Dead Hard Drive With Bitwar Data Recovery

This article introduces a reliable hard drive recovery software to recover data from a dead hard drive. You can rescue your data when the hard disk is dead, damaged, or failed.

 
When the hard drive does not respond to any request, we could access nothing, and then we said it is dead. The disaster of the dead hard drive means you will lose your data on your computers, such as pictures, music, documents, and other files.

What Causes a Dead Hard Drive?

      1.  Corrupted areas on your hard drive – If you ever try to access files stored in these corrupted areas, your computer might respond by freezing. Its hardware devices such as the mouse and keyboard keys and all the active programs on the taskbar might get dormant. If you shut down and restart your computer, the problem should resolve itself to indicate that your disk is fine. But if you reaccess files on the corrupted areas, the computer will freeze again.
 
      2.   Irregular computer maintenance – Computer hard disk manufacturers say that we have to maintain the computer. To do that regularly, you must run the Disk Defragmenter once or two times a month. If you don’t do that, your computer is getting slower every day, and the hard drive may die any day.
 
      3.   Mechanical damage -If your hard drive’s head crashes, it will no longer read, write, or store data correctly. You can tell that your disk has a mechanical fault by listening to the noises it makes when running. If you hear grinding, clicking or scraping noises, that’s a sign that the read-write head is scratched and damaged. You need to contact the hard disk vendor to resolve this issue.

Is it possible to recover data from a dead hard drive?

If the hard drive is dead, you can hardly fix it. It may not matter if the hard drive is gone, but some of the lost data may be extremely important. However, you should not worry unless the lost files were corrupted. You can recover data from the dead hard drive in full.
 
For data stored on the hard disk, unless corruption has occurred within the files, the files can be saved at the old storage space with no moves. If you do not save any new data on the storage space to overwritten it, the lost data can be recovered.
 
Thus, if you want to recover data from hard drive, you should stop saving any data to the hard drive.

How to recover data from a dead hard drive?

Bitwar Data Recovery software is a full version hard drive recovery software, and it can recover lost data from a dead hard drive. Besides this, it also can quickly recover deleted, formatted or inaccessible files from Windows PC, laptop, hard drive, SSD, memory card, USB drive, SD card, camera, and other storage devices.

Steps to recover data with Bitwar Data Recovery

Restart your computer and don’t open the partition that has corrupted areas on it. If you can’t restart your computer or your computer will freeze up after restart. You should remove the hard drive from the PC, and then connect it to another computer. Restart the new one and make sure the new computer recognizes the connected dead hard drive.
 
Then free download and install Bitwar Data Recovery Software in your computer. Please remember don’t save any data to the partition where data lost.

Step 1: Launch Bitwar Data Recovery and select your partition or device where the data lost from, then click “Next.” If you want to recover data from the external storage device, you’d better connect it to your computer and then select it.
 
Step 2. Select the “Quick Scan” mode and then hit “Next.” If files are not found after a quick scan, you can try “Deep Scan.” The deep scan can find all the data with a detailed scanning algorithm, but will not display the file names and may take longer time.

Scan-quick.png

Step 3. Choose the exact file types and then click on “Scan” to start to scan the available data.

File types-all.png

Step 4. After a scan, you can make a selection with the preview before recovery after determined choose them and click “Recover” button to save them to other partitions or external devices.
 
Note: DO NOT save the files into the original partition to avoid data overwriting.

Pre-pic5.png

Let’s try it now!

Please refer here for more about hard drive data recovery.

Windows Cannot Access the Specified File

If files are inaccessible on your PC with the demand “Windows cannot access the specified device, path or file.” Don’t worry, this article introduces the solutions to solve this issue and provides the best data recovery software to help you recover data.

You may see the image below when you are trying to start a program or open a file on your Windows computer. But do you know the possible reasons that make Windows fail to access the specified device, path, or file as normal? And do you want to restore the lost data?

Windows Cannot Access the Specified Device Path or File

Causes of the error:

You may not have the appropriate permissions to access the item because of the following reasons.
 
        1. You don’t have permissions to the file, the folder or the drive.
        2. You are clicking a shortcut to access a file on an external drive or a network location that is now not correctly connected to the PC or is not available.
        3. The data has been deleted or moved to another location. Or the file or its shortcut is corrupt.
        4. Windows may block the file.
        5. The anti-virus software of your computer blocks the file.

Methods to solve the error:

Fix 1: Check the permission of the file or folder

If you don’t have permission to access the file or folder, you may encounter this error. So check what you can do with the file or folder. Follow these steps:
 
1. Right-click the file or folder, and then select Properties.
2. Select the Security tab.
3. Under Group or User names, click your name to see the permissions you have.

Windows Cannot Access the Specified Device Path or File


4. Select “Edit,” and then check the checkboxes for the permissions that you need (For example, if you want to modify the file or folder, check the checkbox next to it). If you are not sure which Permission you should select, check all boxes. And then select “OK.”

Windows Cannot Access the Specified Device Path or File


If you have enabled the permissions, this method doesn’t work for you, move to the next method.

Fix 2: Check the file location

You might get this error if the shortcut or installation is attempting to access a location that is not currently available such as a networked or a removable drive. Check the path of the file that Windows cannot access and make sure that the location is accessible. If the shortcut or other file types have been corrupted. You should check for corruption in shortcuts by recreating the shortcut.

Fix 3: Make sure the file has not been moved or deleted

You can also receive this error if the file has been moved or deleted. Browse to the location of the data and make sure the data is in that location.

Fix 4: Unblock the file

In some cases, the data may be blocked by Windows.
1. Right-click the blocked file and then select Properties.
2. In the General tab, select Unblock if the option is available.

Fix 5: Check if your antivirus software is blocking the file

You can check if your antivirus software is blocking a file by temporarily disabling it, and then try to open the file. If your antivirus software is disabled, you should re-enable it as soon as possible.
However, disabling your antivirus software or changing the settings may make your PC vulnerable to viral, fraudulent, or malicious attacks. Microsoft does not recommend that you disable your antivirus software or change the settings. 

Fix 6: Recover the deleted or corrupted files

If the file is corrupted or deleted, you can recover them with Bitwar Data Recovery.
 
Bitwar Data Recovery is a professional data recovery software compatible with various devices, including digital cameras, hard drives, SD cards, Memory cards, media players, and portable drives. Whenever you deleted these files or lost them due to virus attack, accidental formatting, or partition losing, you can get them back by using this software.
 
Bitwar Data Recovery is clean and user-friendly software. More importantly, it allows you to perform quick recovery but also supports deep scan, which can find out more lost files with a detailed scanning algorithm. What’s more, and it also supports raw recovery.)

Supported OS: Windows 10/8/7/XP/Vista, Mac OS X (10.11 El Capitan, 10.12 Sierra, 10.13 high Sierra) on iMac, MacBook, Mac Pro, etc.

Why not have a try?

Please refer here for more about data recovery.

USB Ports Not Working

USB ports not working” is a common error during the computer operation. In this case, the problem lies with the USB ports and not with any particular device. In this writing, we will talk about how to solve this problem with some effective ways, check it and find how.

A lot of computer users tell us that “USB ports not working in Windows 10/8/7” and usually require the way to solve. USB ports enable USB devices like USB flash drive, SD card, external hard drive, pen drive, etc. to be inserted to a computer in order to transfer data through digital cables. But when USB ports stop working, your PC won’t be able to read and recognize any of those portable devices. This leads to users facing the issue of USB ports not working error, in which USB ports stop recognizing any USB device, whether it be USB Mouse, Printer, Pen drive, Keyboard and so on. 

Reasons for USB Ports Not Working 

You may experience having USB port trouble all of a sudden. There can be many reasons for Windows did not recognize your device. When users face problems with USB drive not showing up, most people believe that their drive is dead. However, this is only the worst-case scenario. There are also some other possible reasons:

1. The first reason should be as a result of an incomplete or unsuccessful connection between your USB device and your computer through the USB port;

2. The second possible reason that can result in problematic USB ports is that the installed USB controller drivers have been corrupted or deleted;

3. And considering the claim of some users, the third reason why USB ports are not working lies in the specific device drivers of your USB device. It’s either the specific USB driver is not yet installed on your PC or it has been corrupted.

Hence, if this has ever happened with you, don’t worry; we’ve worked out some practical solutions to help solve the problem.

Ways to Fix USB Ports Not Working Error

Solution 1: Restart Your Computer

Sometimes you may be lucky to find the easiest solution for solving problems. The easiest way is to restart your computer, or simply turn it off and then turn it back on again when the error is an unavailable USB port.

After the computer has finished restarting, go ahead and insert your USB device. If it works, that means the error has got itself over. A lot of things get updated under the hood when you restart a computer, which can surely fix a lot of different problems.

If you aren’t that lucky, then you’ll want to move on to more useful solutions.

Solution 2: Check the Power Management Setting 

Usually, your system turns the USB controllers off when they are not using. Windows have done this to save battery power, but it mechanically switches them back on when you need them. However, some technical malfunctions prevent your system from operating this task correctly. So, you need to set your system from ‘managing’ the power settings for your USB devices and controllers. To do that, follow the steps below:

1. On your keyboard, press Win Key+X.

2. Choose Device Manager from the list.

3. Look for Universal Serial Bus Controllers, then expand its contents.

4. On the list, double-click the first USB Root Hub device.

5. Go to the Power Management tab.

6. Cancel the “Allow the computer to turn off this device to save power” option.

7. Click OK to save the changes. 

If there are multiple USB Root Hub devices under the Universal Serial Bus Controllers list, you have to repeat steps 3 to 5 for every device

Solution 3: Update Windows System

To upgrade the Windows system, follow these steps:

1. Go to Settings and choose System and Security;

2. Next, users need to click the “Check for updates”;

3. The Windows system will be upgraded.

4. Then, users need to restart the computer and connect the flash drive to check that the error is fixed. 

This will solve issues with your USB root hub, and Windows may recognize your flash drive.

Solution 4: Format the USB device

Nevertheless, if you’ve tried all the above and nothing works, then your USB drive may be faulty. You’ll need to format the USB drive to get it to work again. It is recommended to recover your data using a reliable data recovery tool as it might be a problem with your USB drive itself.

The first step you should do is to check the USB device whether can be found in the Disk Management, follow these steps: Press Win Key + R and then type Diskmgmt.msc to open the window, after that, confirm the USB device existed or not.

If the answer is yes, then you can use the free data recovery software – Bitwar Data Recovery to retrieve the data from this USB with the following steps:

1. Download Bitwar Data Recovery and install the software in your computer system.

2. Connect the USB drive and launch the recovery software and set desired Recovery mode depending on the issue. If you do not know the exact reason, then select it to Wizard Mode.

3. Choose the type of data you desire to restore and click on the Next button to start the scan. If you do not know what data is to be restored then select all types and click on Next.

4. Once scanning has finished, all the missing files matching the selection will get listed; this will let you preview the data one by one for selection. Select, the data you wish to restore and then click on “Recover” to retrieve it back.

Easy Recovery!

Please refer here for more about not working USB data recovery.  0

Recover Lost Data by DiskPart Clean

Mistakenly cleaned data or partition with a DiskPart command sometimes happen when using a computer. What should we do then? In this writing, we will talk about how to recover data lost by DiskPart clean with a recovery tool, check it, and find how.

“I am in big trouble because I have made a terrible mistake that I used the clean command of DiskPart on my hard drive.  Now when I turn on the hard drive, it shows only three partitions instead of four. I stored all my important files on it. It deleted my partition containing important files. What should I do to restore my partition data? Is it possible to recover data lost by DiskPart clean? Please help. Thank you!!!”

Sometimes you have made such or similar blunder and lost your partition then you don’t have to worry about it! It is because you can recover data lost by DiskPart clean in just a few minutes by using a recovery tool. Before learning the details of recovery, let’s check something about DiskPart first.

What is DiskPart?

Diskpart is a built-in partitioning utility on Windows system, which is used to create, delete or combine the partitions on internal and external hard drives, USB Flash drives or other storage devices. 

It can also apply for reallocating or allocating drive letters and even for performing drive conversions. It controls many commands to perform functions on partitions like CREATE, CONVERT, RESCAN, ADD, etc.

Similarly, DiskPart even offers CLEAN order that will wipe all or some of your partition on your hard disk with focus. Its syntax is: DISKPART> Clean [all].

All attribute in the command specifies that every sector on your hard disk should be cleaned, by turn deleting all your data present on the drive.

Hence, be careful and ensure you have a backup of your entire data before using this command. If you’re not similar with operating DiskPart controls, you’d better not try it because it will cause data loss. If you have mistakenly operated it, the editor strongly recommends software for recovering data lost by DiskPart clean.

Warning: Once you have lost your data, you should stop using the disk or device.  Or your data will be overwritten and lead to permanent loss which can’t be restored.

The Features of the Bitwar Data Recovery

The Bitwar Data Recovery is an excellent tool that allows you to restore your entire data even after the DiskPart clean order is performed on your drive. It scans your whole hard drive repeatedly to find and locate all the data on your disk including those are deleted, lost or inaccessible. Then it gets the data back from the desired partition securely without worrying about the damage to both data and the drive. Thus, it ensures finish recovery with high trust. Some of the features of this master are:

1. Quickly get your partition data back even from your hard drives, external hard drives, USB drives, and other storage devices;

2. After recovery, it shows you to sort the files based on the file name, size, date of creation, file signature and others;

3. Compatible with all various versions of Windows OS which includes Windows 10, 8, 7, Vista, Server 2003 & 2008, 2000, and XP;

4. Moreover, the Bitwar can also rescue data from missing, inaccessible, and damaged partitions from your Windows. Besides, it can also help you to regain data from disks having bad sectors, effectively and successfully.

How to Recover Data Lost by DiskPart clean?

First, we have to launch the Bitwar Data Recovery to get its main interface as follows.

Why not have a try?

Please refer here for more about DiskPart Clean data recovery.

SD Card not Reading on Windows

SD cards can be used to store digital media. However, is your SD card not reading or working? This article will offer you several solutions to fix the SD card not reading, working, being detected, or showing up. If it has caused data loss, apply Bitwar for quick and competent data recovery on your SD card.

The data on the SD card may lose if these problems occur

  • 1. SD Card not reading or showing up on phone or PC
  • 2. SD Card is unrecognized on phone or on computer
  • 3. SD Card is not detected on phone or PC
  • 4. Any content cannot be added, deleted, copied, or saved on the SD Card

Why is SD Card Not Reading?

  • 1. Poor contact between the SD card and your PC
  • 2. The SD card is infected by a virus
  • 3. The SD card’s file system is damaged or unrecognized
  • 4. The device driver is out-of-date

These problems are common. When browsing forums, we find many users are complaining that the SD card not reading on their phone or PC. Thus, it is necessary to know how to deal with such problems.

For the above reasons, we list some solutions to solve these problems. You can try them to save your SD Card

Tip: Do not make any changes to your SD card before reading the following steps to solve the problems and recover the data on your SD Card.

How to Fix Sd Card Not Reading?

Solution 1: Connect/ insert SD card to another device

When your SD card is not reading or showing up, firstly you should check whether your device has incompatibility or driver-related issues.

1. Change your SD card reader or SD card USB adaptor to a new one.

2. Connect the SD card to another PC. 

Then test your SD card in another device. If it does work with another PC or a new SD card reader, it is not a faulty SD card. 

If the SD card is still undetectable or not reading on another device, the problem is in your SD card. Other solutions are in the following parts.

Solution 2: change the drive letter of your SD card.

If your SD card is connected to PC but is still not reading in File Explorer, you can go to Disk Management to check whether drive letter of SD card is missing or disappearing.

If it’s so, you need to assign a new drive letter to your card and make it recognizable again with the steps below:

Step1: Open Run dialogue by pressing “Windows + R” at the same time.

Step2: Open Disk Management by inputting “diskmgmt.msc.”

My SD Card not Reading on Windows 10, How to Fix?

Step3: Find the SD card, right-click the partition on it, then select”Change Drive Letter and Path…”.

Step4: Assign the drive letter of your SD card by clicking “Add” in the pop-up window.

Solution 3: Try CHKDSK to make the SD card recognizable

Step1: Right-click on “My Computer/This PC”, then select “Manage”, click on “Disk Management.”

Find the device in the drive viewer, then check out whether the SD card can detect or not. If not, continue the process with the CHKDSK command with the following steps.

Step2: Press “Win+R” keys. Type: cmd and hit “Enter”.

Step3: Type: chkdsk D: / f and hit “Enter”.

My SD Card not Reading on Windows 10, How to Fix?

By doing so, it will check and fix the found errors in the SD card automatically and make the SD card detectable again.

Solution 4: Update the SD Card Driver

  • 1. Connect your SD card to the system
  • 2. Right-click on My Computer and choose “Manage”. Then click “Device Manager”. You’ll see a yellow mark. Beside the card reader. 
  • 3. Double-click Disk Drives from the list. And then, Right Click on the name of your removable drive. Then Click Uninstall and Ok.
  • 4. Reboot your computer, then the device can detect your SD card.

Solution 5: Data recovery software will help

Nowadays, with the rapid development of data recovery technology, SD card data recovery is easy. Professional data recovery software – Bitwar Data Recovery will help you to restore the data on your SD card.

Bitwar Data Recovery is a risk-free data recovery program for getting back various deleted files, of different kinds of storage media like removable hard drive,  hard drive, USB drives, digital camera SD card.

Step1: Free download SD card data recovery software of Bitwar Data Recovery. You can download it directly on the website: http://www.bitwar.net/data-recovery-software/

7984298461?profile=RESIZE_710x

Now You Get It!

Please refer here for more about SD Card data recovery.

Easy Hard Disk Data Recovery Software

Have you ever formatted your hard Disk and lost files you need? Easy and free hard disk recovery software — Bitwar Data Recovery supports you to restore your data quickly.

Data loss is a common issue, not only at the individual level but also in professional environments. We may lose flies on the hard disk due to different reasons. So what should we do after data loss? How to retrieve them? Bitwar Data Recovery allows you to get back your data even without an acceptable backup solution.

How Does Data Lose?              

1. Physical Damage: Physical damage happening to your hard disk is irreversible and may require professional recovery service.

2. Logical Data Loss: Logical data loss including files lost due to accidental deletion or formatted hard disk may be more effortless to restore.

The most common mistake most people make is to clean or empty the recycle bin, which will thoroughly remove the computer’s reference to the file storage location.
 
According to the hard drive file system or the type of device that stores the missing files, Bitwar Data Recovery hard disk data recovery software can find the file as long as it has not been overwritten.

Why Choose Bitwar Data Recovery?

1. It is easy, and safe to use.

2. It is fast, reliable and 100% clean with powerful functions.

3. It offers a 30-days free trial for users.

4. It provides a unique user-friendly wizard interface.

How to Restore Files from Formatted Hard Disk?

Step 1: Free download Hard Disk Data Recovery Software.

Download it on the official website: https://www.bitwar.net.

Easy & Free Hard Disk Data Recovery Software


It supports Windows 10, 8, 7 as well as Mac OS. After downloading it, install the data recovery program on your computer or laptop.
 
Tip: Install Bitwar Data Recovery software on different drives to prevent overwriting any data on the file.

Step 2: Launch Bitwar Data Recovery and choose recovery mode.

Choose Formatted Disk Recovery on Standard Mode.
 
Bitwar Data Recovery supports 6 recovery mode: Deleted Files Recovery, Formatted Disk Recovery, External Devices Recovery, Recycle Bin Recovery, Lost Partition Recovery, and Deep Recovery.

Easy & Free Hard Disk Data Recovery Software

Step 3: Choose Disk Partitions and Devices.

Select the disk you want to retrieve, then click “Next” into the file scan status.
 
Tip: In the progress of data recovery of the hard disk, the data should be written in the source disk, and the disk is not allowed to be defragmented.

Easy & Free Hard Disk Data Recovery Software

Step 4: Select the file type

You can select all type to restore or choose a specific file type to recover, such as Images/Photos, Audio, Document, Videos, etc. Then click “Scan”. 

Easy & Free Hard Disk Data Recovery Software

Step 5: Preview and recovery

After scanning, files are listed with the file name, type path, time and so on.
 
You can Preview them, then choose those you want to restore and click “Recover“.

Easy & Free Hard Disk Data Recovery Software

Free Download!

Please refer here for more about hard disk data recovery.

Design a site like this with WordPress.com
Get started